zIndex property in React Native is an integer value which is used to control the stacking order of components and is typically applied to views, especially those using absolute positioning.
A higher zIndex value means that the component will be displayed above components with lower zIndex values.
Here’s basic example :
<View style={{zIndex:2}}>
           <Text>On top</Text>
</View>
<View style={{zIndex:1}}>
           <Text>Below</Text>
</View>
zIndex property is supported in React Native for iOS, but it is not fully supported on Android. For Android, you can use elevation as an alternative option.
Let’s design below layout using two different approaches,
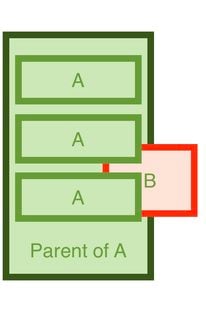
Solution 1 : With Transparent Background
In this solution, you have to set the background color of “Parent A” as transparent and “Element B” will be positioned separately outside of “Parent A”.
To manage touches, set pointerEvents to “box-none” on Parent A.
The below code shows how we can achieve this by giving transparent background:
import React from 'react';
import {StyleSheet, View, Text, Pressable} from 'react-native';

//Element B with absolute position and it is clickable
const ElementB = () => (
  <Pressable
    style={[styles.elementView, styles.elementB]}
    onPress={() => alert('on click B')}>
    <Text>B</Text>
  </Pressable>
);

//Clickable Element A
const ElementA = () => (
  <Pressable
    style={[styles.elementView, styles.elementA]}
    onPress={() => alert('on click A')}>
    <Text>A</Text>
  </Pressable>
);

//Parent A with absolute position & transparent background
const ParentA = () => (
  <View style={[styles.boxView, styles.parentA]} pointerEvents={'box-none'}>
    <ElementA />
    <ElementA />
    <ElementA />
  </View>
);

//Element B and Parent A both are on same level
function App(): JSX.Element {
  return (
    <View style={styles.container}>
      {/* extra view to display background color of Parent A */}
      <View style={[styles.boxView, styles.backgroundView]} />
      <ParentA />
      <ElementB />
    </View>
  );
}

const styles = StyleSheet.create({
  container: {
    flex: 1,
    justifyContent: 'center',
    backgroundColor: 'white',
  },
  boxView: {
    width: 230,
    height: 350,
    left: 25,
    position: 'absolute',
  },
  backgroundView: {
    borderWidth: 10,
    borderColor: '#385717',
    backgroundColor: '#cbe8b5',
 zIndex: -1, 	//low priority
  },
  parentA: {
    padding: 10,
    justifyContent: 'space-evenly',
    alignItems: 'center',
    backgroundColor: 'transparent',
    zIndex: 2,	//highest priority
  },
  elementView: {
    borderWidth: 10,
    justifyContent: 'center',
    alignItems: 'center',
  },
  elementB: {
    position: 'absolute',
    height: 100,
    width: 140,
    top: '50%',
    left: 160,
    backgroundColor: '#fbe3d8',
    borderColor: '#ed2400',
 zIndex: 1,	//mid-level above green background and below element A
  },
  elementA: {
    height: '25%',
    width: '90%',
    borderColor: '#649d34',
    backgroundColor: '#cbe8b5',
  },
});
Solution 2 : Nesting Element B Inside Parent A
In this solution, you have to nest “Element B” inside “Parent A” as we can not give a higher Z-index to child elements (“Element A”) than their parent element(“Parent A”).
By doing this, Element B becomes a child of Parent A.
The below code shows how we can achieve this by nesting Element B inside parent A:
import React from 'react';
import {StyleSheet, View, Text, Pressable} from 'react-native';

//Clickable Element A
const ElementA = () => (
  <Pressable style={styles.elementA} onPress={() => alert('on click A')}>
    <Text>A</Text>
  </Pressable>
);

//Clickable Element B with absolute position and it is within Parent A
const ElementB = () => (
  <Pressable style={styles.elementB} onPress={() => alert('on click B')}>
    <Text>B</Text>
  </Pressable>
);

//Parent A with absolute position & Element B is child of Parent A
const ParentA = () => (
  <View style={styles.parentA}>
    <ElementA />
    <ElementA />
    <ElementA />
    <ElementB />
  </View>
);

// main view
function App(): JSX.Element {
  return (
    <View style={styles.container}>
      <ParentA />
    </View>
  );
}


const styles = StyleSheet.create({
  container: {
    flex: 1,
    justifyContent: 'center',
  },
  parentA: {
    position: 'absolute',
    width: 230,
    height: 350,
    left: 25,
    paddingVertical: 10,
    justifyContent: 'space-evenly',
    alignItems: 'center',
    borderWidth: 10,
    borderColor: '#385717',
    backgroundColor: '#cbe8b5',
  },
  elementB: {
    position: 'absolute',
    height: 100,
    width: 140,
    right: -70,
    bottom: '20%',
    backgroundColor: '#fbe3d8',
    borderWidth: 10,
    borderColor: '#ed2400',
    justifyContent: 'center',
    alignItems: 'center',
  },
  elementA: {
    zIndex: 1,
    height: '25%',
    width: '90%',
    backgroundColor: '#cbe8b5',
    borderWidth: 10,
    borderColor: '#649d34',
    justifyContent: 'center',
    alignItems: 'center',
  },
});
Both solutions will work on both Android and iOS, and you can choose the one that best suits your design and functional requirements.
Need Help With React Native Development?
Work with our skilled React Native developers to accelerate your project and boost its performance.
Hire React Native Developers