Table of Contents
What is SignalR?
SignalR is an open-source ASP.NET Core library that helps to add real-time functionalities to implement SignalR in .NET Core web applications.
Use Cases for SignalR in .NET Core
- ASP.NET Core applications that demand high frequency server updates.
- Dashboards & Monitoring applications.
- Team meetings applications and collaborative apps
Prerequisites
- Visual Studio Code
- Basic Knowledge of ASP.NET Core
- ASP.NET Core Web Application
Tutorial Goal: SignalR with .NET Core
SignalR in .NET Core tutorial will help to learn how to implement SignalR in .Core Web Application. Here are the takeaways from the guideline:
- Add SignalR Client Library
- Create SignalR Hub
- Configure the project
- Build user interface and add logic to send and receive messages
Steps to Implement SignalR in .NET Core
Our first step would be to create a .NET Core web app project. We won’t be discussing how to build it as it something, we suppose, you already know.
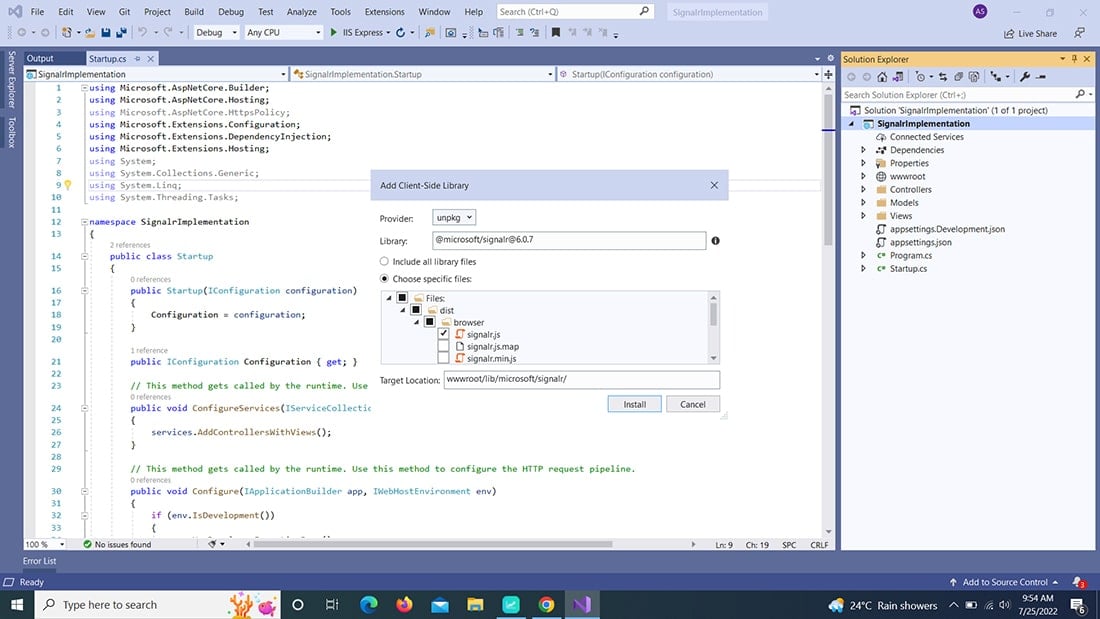
So, moving further to implement Signal R in ASP.NET Core, we need to add SignalR client library in the project.
To add SignalR client library follow the below screenshot.

Once done with the installation, create SignalR Hub: ChatHub Class. For that you can use the below code.
// ChatHub.cs

using Microsoft.AspNetCore.SignalR;
using System;
using System.Collections.Generic;
using System.Linq;
using System.Threading.Tasks;

namespace SignalrImplementation.Models
{
    public class ChatHub : Hub
    {
        public async Task SendMessage(string user, string message)
        {
            await Clients.All.SendAsync("ReceiveMessage", user, message);
        }
    }
}
Want to have easy and hustle-free .NET Core application development?
Bacancy is here for you! Contact us to hire .NET Core developer to fulfill your project requirements efficiently with commendable problem-solving skills.
Now, add service reference in ConfigureServices method in startup.cs.
// startup.cs

public void ConfigureServices(IServiceCollection services)
  {
    services.AddControllersWithViews();
    services.AddSignalR();
 }
Add chathub class in Configure method in startup.cs.
// startup.cs

public void Configure(IApplicationBuilder app, IWebHostEnvironment env)
  {
    if (env.IsDevelopment())
       {
          app.UseDeveloperExceptionPage();
        }
     else
        {
           app.UseExceptionHandler("/Home/Error");
           app.UseHsts();
         }
            app.UseHttpsRedirection();
            app.UseStaticFiles();
            app.UseRouting();
            app.UseAuthorization();
            app.UseSignalR(routes =>
            {
                routes.MapHub("/chatHub");
            })
            app.UseEndpoints(endpoints =>
            {
                endpoints.MapControllerRoute(
                    name: "default",
                    pattern: "{controller=Home}/{action=Index}/{id?}");
            });
  }
Now, the next step is to create new JS file for HubConnection.
// chat.js

const connection = new signalR.HubConnectionBuilder()
    .withUrl("/chatHub")
    .build();

connection.on("ReceiveMessage", (user, message) => {
    const msg = message.replace(/&/g, "&").replace(//g, ">");
    const encodedMsg = user + " :: " + msg;
    const li = document.createElement("li");
    li.textContent = encodedMsg;
    document.getElementById("messagesList").appendChild(li);
});

connection.start().catch(err => console.error(err.toString()));

//Send the message

document.getElementById("sendMessage").addEventListener("click", event => {
    const user = document.getElementById("userName").value;
    const message = document.getElementById("userMessage").value;
    connection.invoke("SendMessage", user, message).catch(err => console.error(err.toString()));
    event.preventDefault();
});
So far we are done with our logic. Let’s build a User Interface for Chat test.
// Index.cshtml

@page
<div class="container">
    <div class="row"> </div>
    <div class="row">
        <div class="col-md-12">
            <div class="col-md-6">
                <div class="col-md-3">User</div>
                <div class="col-md-9"><input type="text" id="userName" /></div>
            </div>
        </div>
        <div class="col-md-12">
            <div class="col-md-6">
                <div class="col-md-3">Message</div>
                <div class="col-md-9">
                    <input type="text" id="userMessage" />
                    <input type="button" id="sendMessage" value="Send Message" />
                </div>
            </div>
        </div>
    </div>
    <div class="row">
        <div class="col-12">
            <hr />
        </div>
    </div>
    <div class="row">
        <div class="col-6"> </div>
        <div class="col-6">
            <ul id="messagesList"></ul>
        </div>
    </div>
</div>
<script src="~/lib/microsoft/signalr/dist/browser/signalr.js"></script>
<script src="~/js/chat.js"></script>
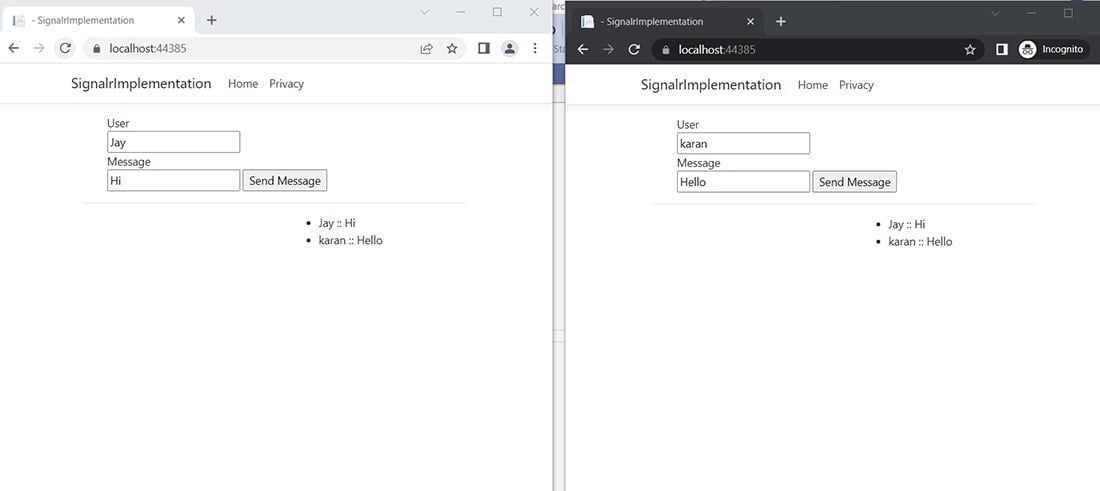
Here we are done with the implementation of SignalR in .NET Core. Run the application in your browser.

Github Repository: SignalR in .NET Core Example
If you want to just clone the repository then here’s the source code: signalr-example. Feel free to clone the demo application and play around with it.
Conclusion
So, this was a step-by-step guideline on how to implement SignalR in .NET Core. We hope this step-by-step guide on implementing SignalR in .NET Core was helpful to you, especially if you’re seeking a skilled NET developer with top-of-the-line expertise in managing complex tasks like this. We are here for you, so please don’t hesitate to reach out to us with any questions, feedback, or suggestions to help us improve our tutorials.
Your Success Is Guaranteed !
We accelerate the release of digital product and guaranteed their success
We Use Slack, Jira & GitHub for Accurate Deployment and Effective Communication.


