Quick Summary
Angular 17 introduces a new hydration feature that includes faster initial load times, superior SEO, and improved performance. Angular hydration renders applications on the server side and then sends them to the client. This feature is available as default in all new apps using server-side rendering. Let’s find out in this comprehensive guide how exciting a new hydration feature can improve your web application. This blog will walk you through enabling Angular hydration, outlining its benefits, its constraints, and how to skip it for specific components.
Table of Contents
Introduction
Angular is a popular platform for building web applications. The framework has introduced its latest version, Angular 17, in October 2023. It has new advanced features, such as built-in control flow, deferable loading, support for view transition API, and router refactoring. However, one feature that has been the talk of the town and creating buzz is the hydration feature.
Hydration is a process that enables Angular to render your application on the server side, resulting in faster initial load times and improved performance. Let’s delve into Angular hydration and understand how to implement it with a step-by-step guide.
What is Angular Hydration?
Angular hydration is a technique that boosts the performance and speed of server-side rendered (SSR) applications. It achieves this by restoring the application on the user’s side and reusing the DOM structure, ensuring data transfer and preserving the application state. In essence, Angular Hydration combines built elements from the server with interactive components to make your app fully functional.
Initially introduced in version 16 as part of the developer preview phase, hydration has now become a default feature in the recent Angular update. Developers have been eagerly anticipating version 17 for its advancements in hydration, which offer destructive capabilities without requiring additional parameters during application creation.
Angular hydration is an addition that significantly enhances web application performance. After going through testing phases, it has now become stable with the release of version 17. Simply put, Angular hydration seamlessly bridges server side rendering with client-side rendering to create an experience and improve overall app performance.
Note: Angular Universal is the official SSR library for Angular.
How to Enable Hydration Using Angular CLI
In the latest Angular 17 version, you can enable server-side rendering by specifying the -ssr flag while creating a new application. Following is the demo, which indicates how you can enable server-side with Angular hydration.
Example of Angular CLI to enable Hydration
Before you start, check the Angular version you want to use in your system. You can check for the Angular version by typing the below code:
If Angular CLI is installed in your system, then you’ll see the Angular version mentioned below-
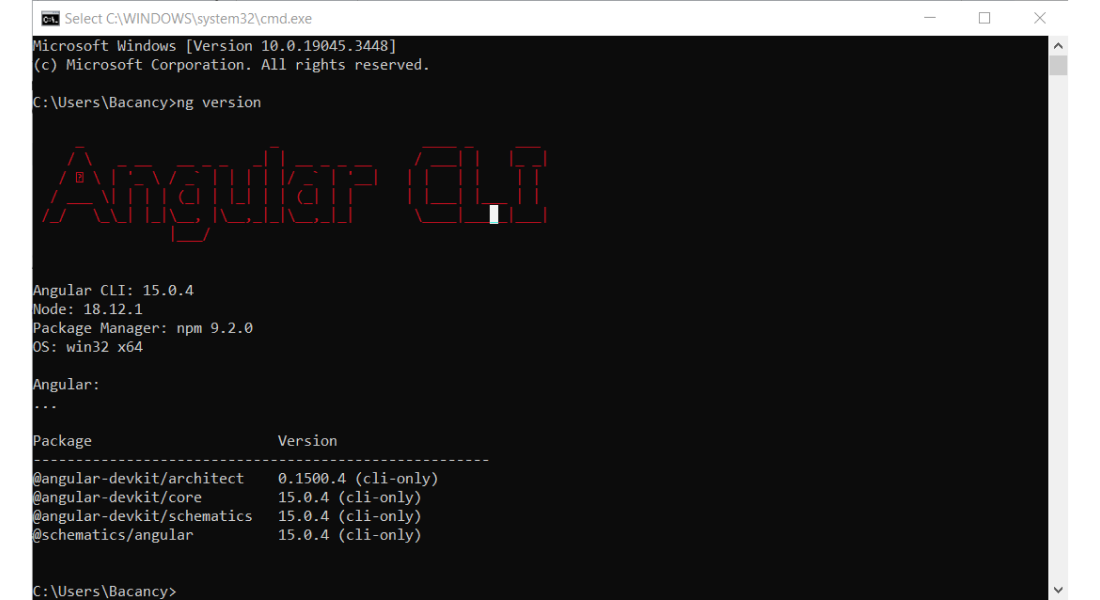
The Angular CLI version is the Angular version; for instance, we took 15.0.4 as an example. However, remember that it always differs from system to system.
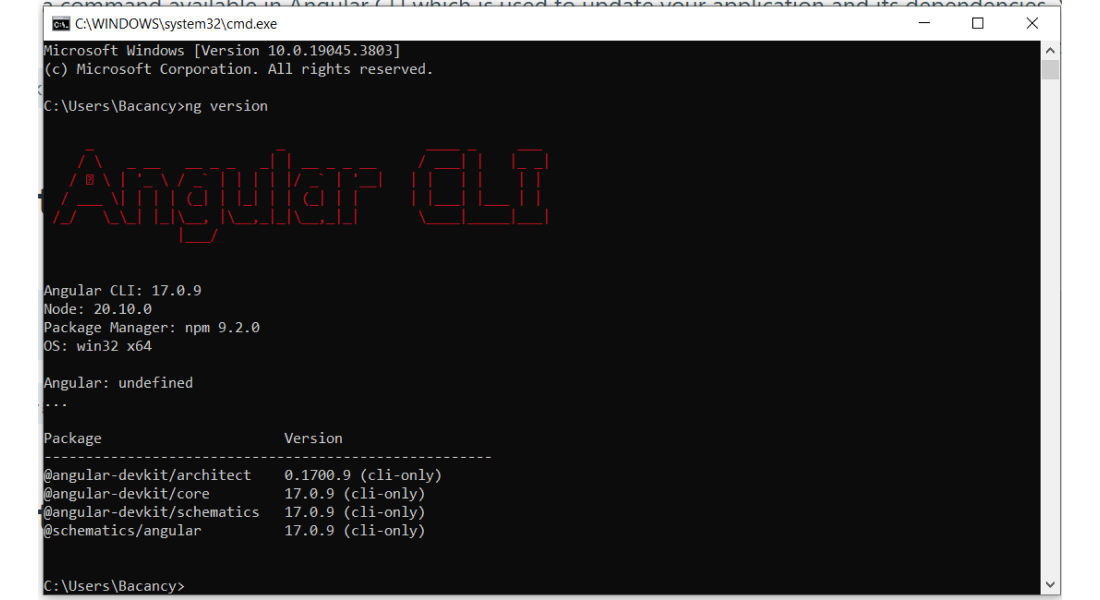
If you are using Angular version 16, you need to upgrade it. Also, you are required to upgrade your CLI version globally.
Here’s an example of the outcome after upgrading to Angular CLI and v17.
Now, let’s get back to enabling Hydration using CLI
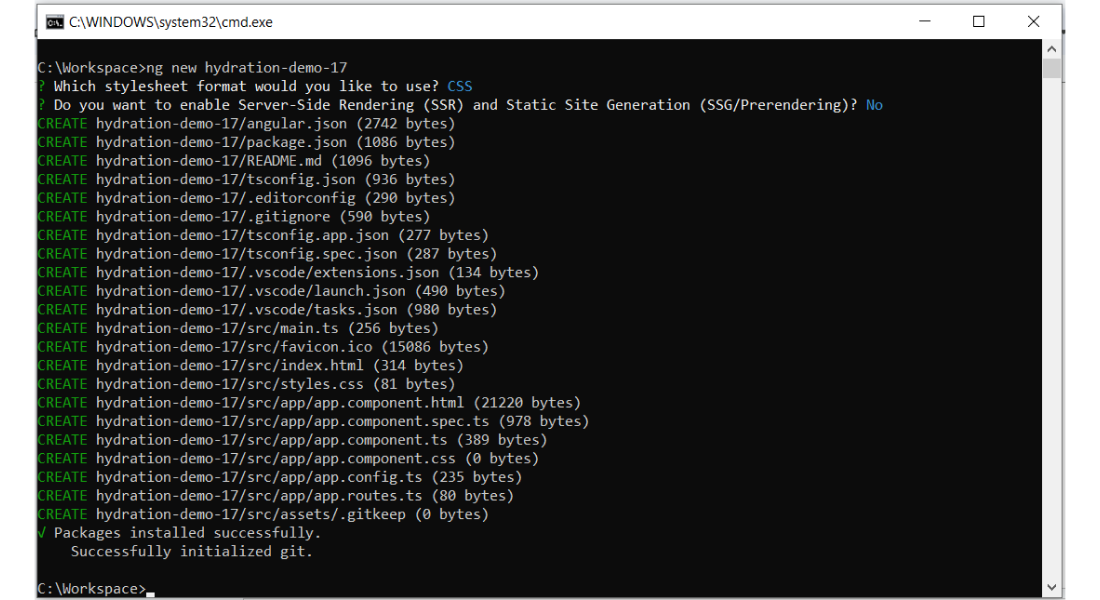
There are three methods available for enabling SSR with Angular Hydration using Angular CLI:
1st method: You can create a new Angular application with SSR enabled.
Run the command – ng new
2nd method: Answer SSR-related questions when starting a new project. If you want to enable SSR right now, click “Yes.” On the other hand, if you enable SSR later, click “No.”
3rd method: Enable SSR in an existing project utilizing the Angular CLI ng command.
Below is the result you will acquire after running all commands:
Let’s move on to the next step. After running the commands, open the new application folder in your preferred IDE. We have taken VS Code.
Note: Before you can get started with hydration, you must have a server-side rendered (SSR) application.
A Step-by-Step Guide to Enable Angular Hydration Using SSR
Let’s understand how to enable Angular hydration of v16 and v17 using SSR. Following are the steps for enabling hydration using server-side rendering in your Angular system.
Step 1: Enable Server-Side Rendering
This command creates and updates application code, enabling SSR and adding extra files to the project structure.

my-app
|-- server.ts                       # application server
└── src
    |-- app
    |   └── app.config.server.ts    # server application
configuration
    └── main.server.ts              # main server application
bootstrapping
Step 2: Enable Client Hydration
➤ For Angular v16
You can enable hydration by updating the app.module.ts file. Import the provideClientHydration function from @angular/platform-browser and add the function call to the providers’ section of the AppModule as shown below.

import { NgModule } from '@angular/core';
import { BrowserModule, provideClientHydration } from '@angular/platform-browser';

import { AppRoutingModule } from './app-routing.module';
import { AppComponent } from './app.component';

@NgModule({
  declarations: [
    AppComponent
  ],
  imports: [
    BrowserModule,
    AppRoutingModule
  ],
  providers: [provideClientHydration()],
  bootstrap: [AppComponent]
})
export class AppModule { }
➤ For Angular v17
You can enable hydration by visiting your main app.config.ts and importing provideClientHydration from @angular/platform-browser. Add it to your app’s bootstrapping providers list.
In my case, the appConfig variable is created in a separate file and exported to main.ts so that all configurations can be used to bootstrap the Angular application.
app.config.ts

import { ApplicationConfig } from '@angular/core';
import { provideRouter } from '@angular/router';

import { routes } from './app.routes';
import { provideClientHydration } from '@angular/platform-browser';

export const appConfig: ApplicationConfig = {
  providers: [provideRouter(routes), provideClientHydration()]
};
main.ts

import { bootstrapApplication } from '@angular/platform-browser';
import { appConfig } from './app/app.config';
import { AppComponent } from './app/app.component';

bootstrapApplication(AppComponent, appConfig)
  .catch((err) => console.error(err));
Step 3: Start the Server
To verify SSR and hydration, run the application locally with the following command-
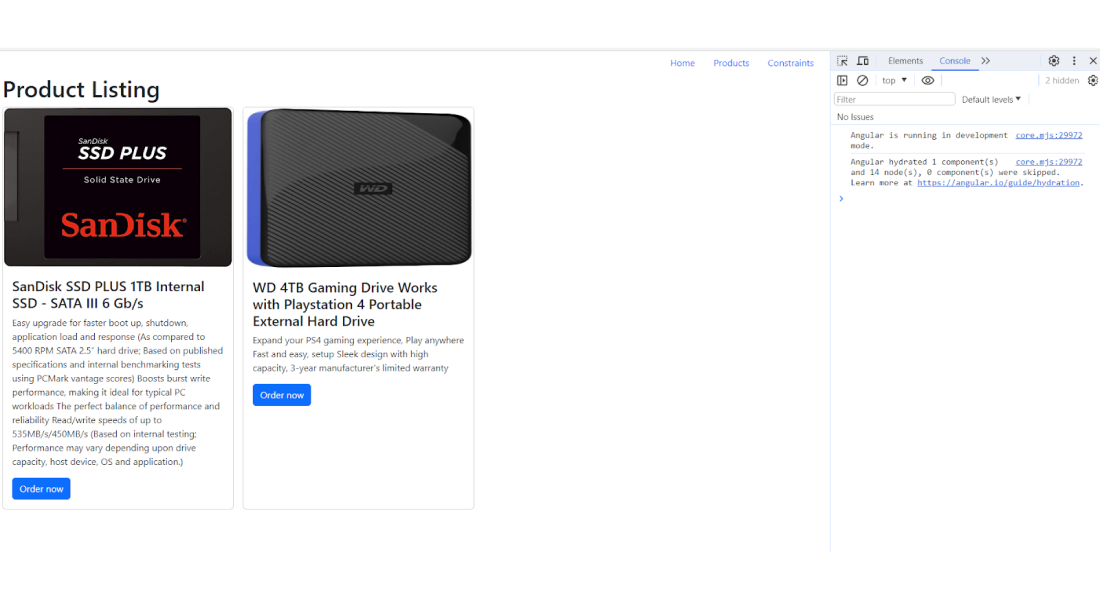
In the console, you can see a statement like – Angular hydrated 1 component(s) and 14 node(s), 0 component(s) were skipped. That means you have enabled SSR along with hydration.
Angular Hydration and its Constraints
The HTML produced during server-side rendering must match the client’s DOM tree structures to avoid hydration problems.
1. Direct DOM Manipulation
If you have components that manipulate the DOM using native DOM APIs, innerHTML or outerHTML, the hydration process will encounter errors. For instance, DOM manipulation is problematic when accessing the document, querying for specific elements, and injecting additional nodes using appendChild. Detaching DOM nodes and moving them to other locations will also result in errors.
Angular is unaware of these DOM changes and cannot resolve them during hydration. Angular will expect a particular structure but encounter a different one when attempting to hydrate. This mismatch will result in hydration failure and throw a DOM mismatch error.
Refactoring your component to avoid this sort of DOM manipulation is best. Try to use Angular APIs to do this work if you can. If you cannot refactor this behavior, use the ngSkipHydration attribute until you can refactor it into a hydration-friendly solution.
Hire Angular js developer from us to maximize the potential of Angular hydration into your application
2. Valid HTML Structure
There are a few cases where if you have a component template that does not have a valid HTML structure, this could result in a DOM mismatch error during hydration.
For example, here are some of the most common cases of this issue.
- < table > without a < tbody >
- < div > inside a < p >
- < a > inside an < h1 >
- < a > inside another < a >
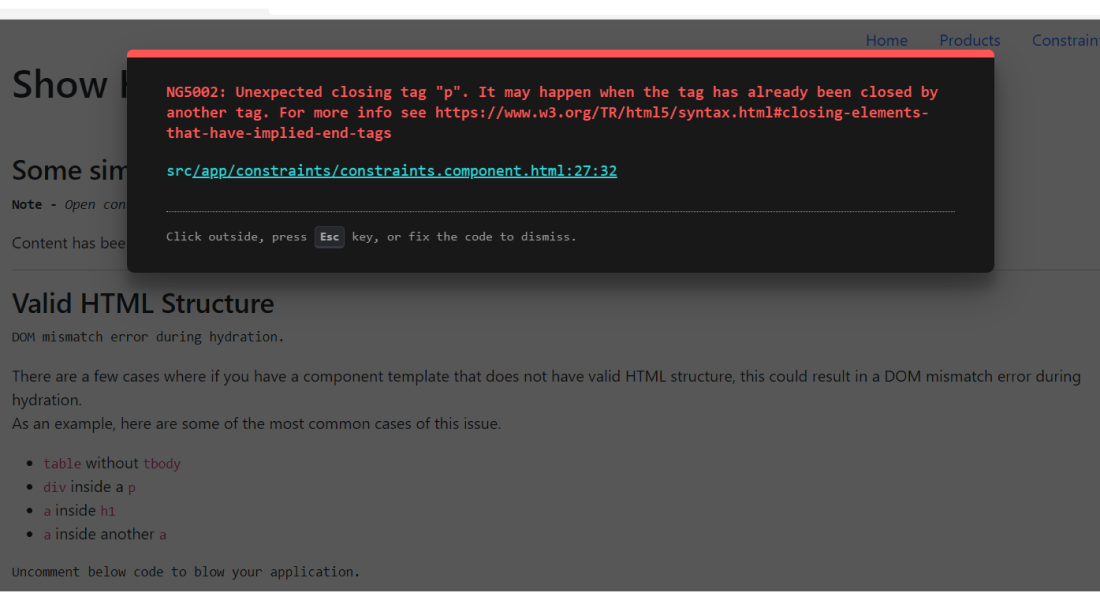
If you are uncertain whether your HTML is valid, you can use a syntax validator to check it. Below is an example error image for < div > tag inside < p > tag-
3. Preserve Whitespaces Configuration
When using the hydration feature, we recommend using the default false setting for preserveWhitespaces. If this setting is not in your Tconfig, the value will be false, and no changes are required. If you choose to enable preserving whitespaces by adding preserveWhitespaces: true to your tsconfig, you may encounter issues with hydration. This is not yet a fully supported configuration.
An example is shown below to enable preserveWhitespaces –

{
  "compileOnSave": false,
  "compilerOptions": {
    ....
  },
  "angularCompilerOptions": {
   ...,
    "preserveWhitespaces": true // default preserveWhitespaces is false
  }
}
Or we can configure it in main.ts –

import { platformBrowserDynamic } from '@angular/platform-browser-dynamic';

import { AppModule } from './app/app.module';


platformBrowserDynamic().bootstrapModule(AppModule, {
preserveWhitespaces: true
})
  .catch(err => console.error(err));
How to Skip Hydration for Particular Components?
Some components may not work correctly with hydration enabled due to some of the aforementioned issues, like Direct DOM Manipulation and Valid HTML Structure. As a workaround, you can add the ngSkipHydration attribute to a component’s tag to skip hydrating the entire component.
Alternatively, you can set ngSkipHydration as a host binding.

import { Component } from '@angular/core';

@Component({
  selector: 'app-show-constraints',
  templateUrl: './show-constraints.component.html',
  styleUrls: ['./show-constraints.component.css'],
  host: { ngSkipHydration: 'true' }
})
The ngSkipHydration attribute can only be used on component host nodes. Angular throws an error if this attribute is added to other nodes.
Remember that adding the ngSkipHydration attribute to your root application component would effectively disable hydration for your entire application. Be careful and thoughtful about using this attribute. It is intended as a last-resort workaround. Components that break hydration should be considered bugs that need to be fixed.
🟠 i18N
Angular v17 still doesn’t support internationalization with hydration, but support is in progress. Components using i18N blocks will have hydration skipped.
🟠 Third-Party Libraries with DOM Manipulation
Several third-party libraries depend on DOM manipulation to be able to render. D3 charts are a prime example. These libraries worked without hydration but may cause DOM mismatch errors when hydration is enabled. Use ngSkipHydration on the component using such libraries to bypass hydration.
🟠 Custom or Noop Zone.js are not yet supported
Hydration relies on a signal from Zone.js when it becomes stable inside an application so that Angular can start the serialization process on the server or post-hydration cleanup on the client to remove unclaimed DOM nodes.
Providing a custom or a “noop” Zone.js implementation may lead to a different timing of the “stable” event, thus triggering the serialization or the cleanup too early or too late. This is not yet a fully supported configuration, and you may need to adjust the timing of the onStable event in the custom Zone.js implementation.
Also, you can refer to Github for demo and result-driven solutions.
Conclusion
This tutorial guide highlights comprehensive insights about Angular hydration, which helps improve faster loading time, SEO, and seamless experience. Angular hydration is a robust technique in Angular 17 that boosts server-side application performance and enhances overall user experience.
By unlocking the potential of Angular hydration, you can avail the benefit of responsiveness and ensure a valid HTML structure. However, if you face complexity in the process, get in touch with an Angular js development company like Bacancy to obtain a result-driven solution and streamline the process.
Frequently Asked Questions (FAQs)
Hydration in Angular makes your app page load faster, efficiently transfers data, and boosts SEO. It ensures smooth transitions and provides an inclusive experience.
Yes, hydration can speed up the Angular app by decreasing resource consumption and adding interactive responsiveness. Additionally, it reduces hosting costs, which is beneficial while developing Angular apps.
In Angular v17, hydration has become a default feature with server-side rendering. Now, developers do not need to add extra complexity or configuration for Angular hydration. It also has enhanced developer experience and transfer optimization.
Your Success Is Guaranteed !
We accelerate the release of digital product and guaranteed their success
We Use Slack, Jira & GitHub for Accurate Deployment and Effective Communication.


