Table of Contents
Introduction
React Native has introduced React Native Hooks, which are functions to let you hook into React Native state and lifecycle features from the function components. Hooks are quite popular in React ecosystem; moreover, hooks have reduced lines of code and developers’ efforts. If you are still not familiar with React hooks, this tutorial will help you understand and explore them.
Prerequisites
- Basic knowledge of React Native
- Familiarity with functional and class components, props, state, etc.
So, moving forward with the introduction of hooks in React Native.
Introducing Hooks in React Native
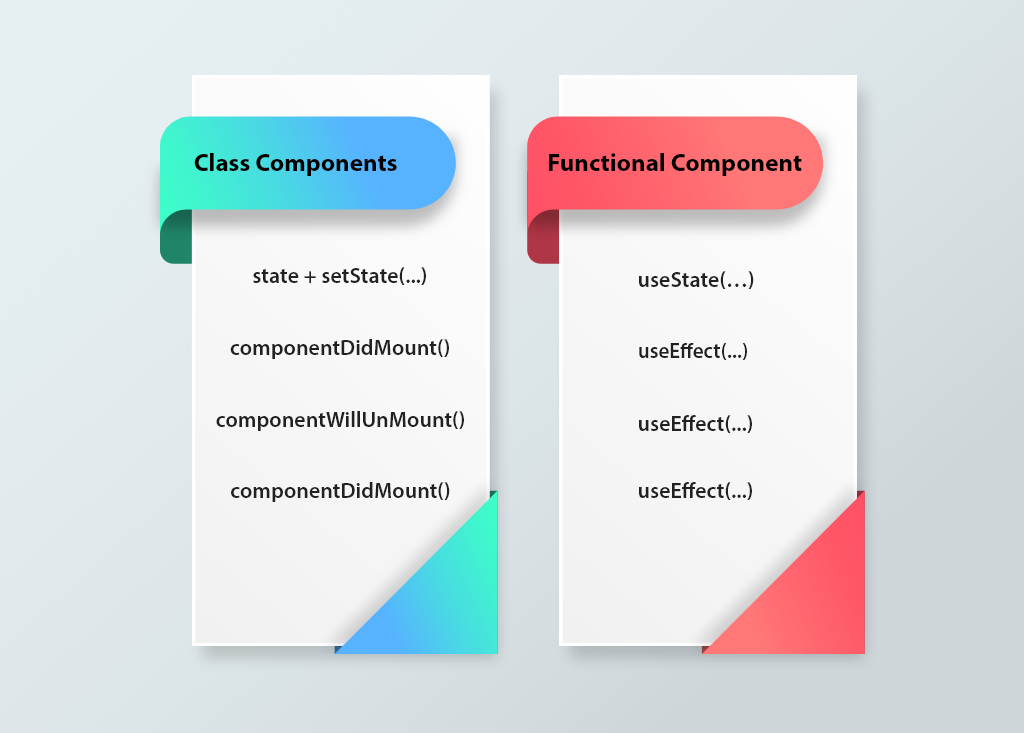
Hooks are a new feature addition in React Native version 16.8, which allows you to use React Native features without writing a class. These built-in functions let React Native developers use state and lifecycle methods inside functional components. With hooks, the complexity of developing the application is lessened. Keep in mind that hooks don’t work inside classes.
Why Hooks?
Here are a few reasons for using hooks in your React Native application.
- Different ways of doing the same things.
- No more complex lifecycle methods.
- Simpler code. No more mapStateToProps, mapDispatchToprops with Redux.
- Hooks avoid the whole confusion with ‘this’ keyword.
- Hooks allow you to reuse stateful logic without changing your component hierarchy.
- Hooks let us organize the logic inside a component into reusable isolated units.
Now let’s learn how we move from a class to a functional component.
Are you looking for skilled and proficient React Native developers?
Here we are to end your search. Contact us today and hire React Native developer. We assure you of the application quality and performance.
React Native Hooks Lifecycle
There are three stages of the lifecycle:
1. Initial Render

getDerivedStateFromProps
   		useEffect( ()=>{},[propp1, prop2])
	componentDidMount
		useEffect( ()=> {},[])
2. Updates

getDerivedStateFromProps
   		useEffect( ()=>{},[propp1, prop2])

shouldComponentUpdate()
	useMemo()

componentdidUpdate()
	useEffect( ()=>{})

getSnapshotBeforeUpdate
	custom Hook to hold previous state
3. Unmount
Thus, we can use hooks to handle states, effects, and context with the help of useState, useEffect, and useContext.
Let’s move towards our next section and dive deeper into hooks.
Hooks in React Native: Classification
There are three basic React Native hooks and seven additional hooks.
Basic Hooks
(1) useState
(2) useEffect
(3) useContext
Additional Hooks:
(1) useReducer
(2) useCallback
(3) useMemo
(4) useRef
(5) useImperativeHandle
(6) useLayoutEffect
(7) useDebugValue
React Native Hooks Example
In this tutorial we will cover useState, useEffect, useContext, useReducer, useMemo, useCallback, and useRef.
useState
useState is like this.state() in class. We are going to use useState instead of this.state() to update the state value. Unlike the class, the state is not an object here. We have to initialize the useState() with some value. It can be a number or string, whatever we want. If you have to store multiple values, then for each value, you have to call useState().
Syntax
The below image would help to understand hooks better.

This example declares a state variable name initialized with an empty string. When writing in the text input name, the variable value will be changed.
useEffect
useEffect is worked as per class lifecycle componentDidMount, componentWillUnMount, componentdidUpdate. useEffect is just re-render the Component and changing the state variable’s value. uesEffect accepts two arguments and doesn’t return anything.
The first argument is a function that holds the code whatever you want to execute at run time. The second argument is optional when you want to execute the hooks. If you do not pass anything to this argument, your function will be called on mount and every update.

import React, { useState, useEffect } from "react";
import { View, Text } from "react-native",

const Example = (props) => {
const [count, setCount] = useState(0)

useEffect(() => {
setInterval(() => {
setCount(count + 1);
   }, 1000);
})

return(
  <View
style={{
flex: 1,
alignItems: “center”,
justifyContent: “center”}}
   >
	<Text style={{ fontSize: 50 }}>
Count is incremented {count} times
</Text>
  </View>
 );
}

export default Example;
The above example shows how we can apply useEffect in functional components. At interval time, the state value will be changed. useEffect() is a side effect used as an event handler to change the state value when you want.
useContext
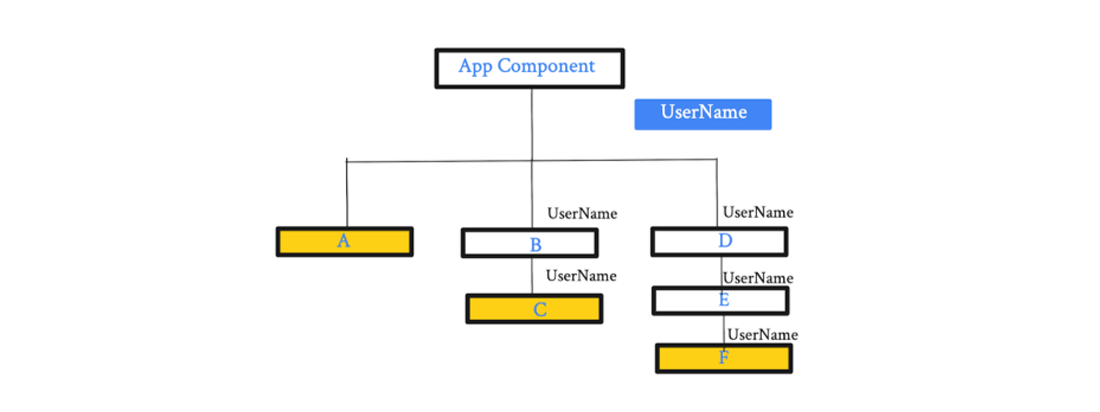
This is another hook for anyone unfamiliar with context API in react native. First, let’s have a look at it. Consider the below image that shows an application has many components.
App Component is our parent component, and within the App component, there are various child components.

You can see the dependency tree in the image above. Here, we have a limitation of a three-level hierarchy. Imagine if we have a 10 to 20-level hierarchy. In such cases, the useContext hook reduces our efforts from passing props to every level.
Don’t forget that the argument to useContext must be the context object itself. Now let you get some basic knowledge about Additional Hooks.
useReducer
useReducer additional hook used as a state management tool. Okay, now don’t we already have useState for state management? Yes, we do have. But, under a few conditions and requirements, it is advisable to use useReducer rather than useState. The next question would be these requirements and the difference between hooks.
To know the difference, let’s have an example. Here we are going to take a counter-example again.

import React, { useReducer } from "react";
import { View, Text ,Button) from "react-native",
import { reducer } from "redux-form";

const initialState = 0;
const reducer = (state, action) => {
     switch(action){
case 'increment':
    return state + 1;
case 'decrement':
                return state - 1;
case 'reset':
                return initialState;
default:
     return state;
          }
   }

 const Example = (props) => {
 const [count, dispatch) = useReducer( reducer, initialState),

 return (
	<View
   style={{
flex: 1,
alignItems: “center”,
justifyContent: “center”
         }}
      >
	   <Text>Count = {count}</Text>
    	   <Button title=’Increment’ onPress= {()=> dispatch(‘increment’)} />
         <Button title=’Decrement’ onPress= {()=> dispatch(‘decrement’)} />
         <Button title=Reset onPress= {()=> dispatch(reset)} />


</View>
    );
  }

export default Example;
We can handle the different actions at once with useReducer. Run the project; we can increase, decrease, and reset the count value by clicking on the increment, decrement, and reset.
useReducer vs. useState
1. Depends on the type of state. If you need to use string, boolean or number value, then choose use useState. And if array or object, then go with the useReducer.
2. The second scenario depends on the number of transitions. If you are updating one or two states, then use useState. And if there are too many updates, then use useReducer.
3. The third one depends on the business logic for the state transition. If you do the complex transition or transfer value old to the new, then better to use useReducer.
4. Fourth is for local or global states. If your state is within the one component, you can use useState, and if your state is at a global level, you must go with useReducer.
useCallback
The next hook is useCallback. With each component rendering, functions are recreated. useCallback always returns the memoized version of the function. After using the useCallback function, it will only be changed when one of the dependencies has.
It is useful when some callbacks are passed to the child component, and with that, you can prevent unnecessary renders every time. Like useEffect, useCallback takes a function and an array of dependencies as a parameter. If one of the dependencies’ values changes, the function’s return value will be changed; otherwise, it will always return the cached value.
Assume we have a parent-child component and pass a prop from parent to child component. In such a case, the props within the child component will be called unnecessary whenever the parent component is re-rendered. We can use the useCallback() hook to prevent such unwanted re-renders.
Let’s go deeper for more understanding.

import React, { useState } from "react";
import { View, Text ,Button) from "react-native",

 const Example = (props) => {
 const [count, setCount] = useState(0)
 const [reset, resetCount] = useState(0)

const increment = () => {
   setCount(count + 1)
}

const decrement = () => {
   setCount(count - 1)
}

const reset = () => {
   resetCount(reset)
}


 return (
	<View
   style={{
flex: 1,
alignItems: “center”,
justifyContent: “center”
         }}
      >
	   <Text>Count = {count}</Text>
    	   <Button title=’Increment’ onPress= {()=> increment()} />
         <Button title=’Decrement’ onPress= {()=> decrement()} />
         <Button title=Reset onPress= {()=> reset()} />
</View>
    );
  }

export default Example;
In the above example, the problem is that all three functions are re-created whenever the counter value is updated. In this case, it is not a big problem to recreate the function unless we don’t have multiple functions. For an application, this might be a big problem in performance for our app. For this problem, we can use useCallback(). So in the above example, we can warp all these functions with useCallback().

const increment = useCallback(() => {
      setCount(count + 1)
}, [count])
const decrement = useCallback(() => {
      setCount(count - 1)
}, [count])
const reset = useCallback(O) => {
     resetCount(reset)
}, (reset)
So now you click any of the counters, the related state will be changed and re-initialized. for the better and to prevent optimization, we can use the useCallback() hook.
useMemo
useMemo() hook is just like useCallback() hook. The difference is that useCallback returns memoized callback, and useMemo returns a memoized value. If you are creating an application that includes extensive data processing, then using the useMemo() hook is a better choice.
So, it will work once at the first render in the application, and then the cached value will be returned every time. If you have userName to pass every time in the application components, then the operation will be done just once with the help of useMemo().
Then state value will be stored in a memoized value, and when you want to use it, you will get it much faster.
If you don’t want to pass arguments, remember to add an empty array as a parameter to useMemo(); otherwise, memoization will not happen. And if you wish to pass arguments, you can also pass them.
useRef
useRef is like a container that can store mutable values in its .current property. With Ref, we can access all the DOM nodes and elements and keep a mutable variable. We all know about a ref in React Native.
Syntax
Creating createRef in the functional component will create a new instance at every render of DOM. Updating a ref is a side effect. It must be done inside the useEffect() or an event handler. However, the component will not re-render when the useRef value changes. For that, we can use useState().
Some Rules
“Only call Hooks at the top level.”
Don’t call hooks inside loops, conditions, or nested functions.
“Only call Hooks from react-native functions.”
Call hooks from React Native Components or Custom Hooks; don’t call them from regular functions.
Conclusion
If you are looking for assistance in building a React native application with the help of React Native Hooks, then get in touch with us today. We are a globally renowned React Native app development company, and we have well-versed React Native developers who have top-of-the-line expertise in building React Native app with React Native Hooks. Also, for more such tutorials, you can visit React Native tutorials page and explore more.
Your Success Is Guaranteed !
We accelerate the release of digital product and guaranteed their success
We Use Slack, Jira & GitHub for Accurate Deployment and Effective Communication.


