PassportJS Authentication in NodeJS: How to Implement Facebook Login Feature in Node.js Application
Last Updated on June 5, 2024
We all must have built a simple authentication system using conventional username and password in our Node.js application. Providing users only one option to log in could snatch away the ease of use from your users. Let us all agree that we tend to use features (if available) like “Login with Facebook”, “Login with Google” instead of signing up and generating a brand new username/password. The repetitive process and setting up your profile for various applications is time-consuming, irritating, and frustrating; moreover, remembering usernames and passwords for all these apps becomes difficult.
To avoid such chaos, one must include social logins in one’s applications. Because of OAuth, we can easily use social media like Facebook, Twitter, and Google for user authentication.
In this tutorial, we will learn How to Implement PassportJS authentication in NodeJS. Here, we will use Facebook Login Feature in our Node.js application. Without further ado, let’s begin our tutorial.
According to documentation,
“Passport is authentication middleware for Node.js. Extremely flexible and modular, a Passport can be unobtrusively dropped into any Express-based web application. A comprehensive set of strategies support authentication using a username and password, Facebook, Twitter, and more.“
Note from the developer– I have tried to explain this blog post in the easiest way possible. I have just focused on the core functionality, i.e., to implement “Login with Facebook.” At the production level, one must add many other things like session management using JWT, etc. I have not included those things here for the sake of simplicity and understanding.
Let’s get started with the PassportJS authentication tutorial.
Follow the step-by-step guide to implement Facebook authentication using NodeJS and PassportJS. Don’t worry, by the end of this tutorial you will be able to implement it by yourself.
To implement “Login with Facebook” on any web application, you will need “client id” and “client secret.” These two parameters ensure a secure oAuth connection between our Node app and Facebook. To get these, you will need to create a Facebook developer account.
So head on to https://developers.facebook.com/ and create a new account.
After creating a Facebook developer account, you will need to create a “test” app which will provide you with app/client id and app/client secret. Also, you need to register your URL, which is going to request Facebook for authentication. (We will look at this in detail later).
After creating and logging into the Facebook developer account, you’ll see the option “Create App.” Hit that option, and you will see something like the image shown below. Select “consumer” as the type of app.
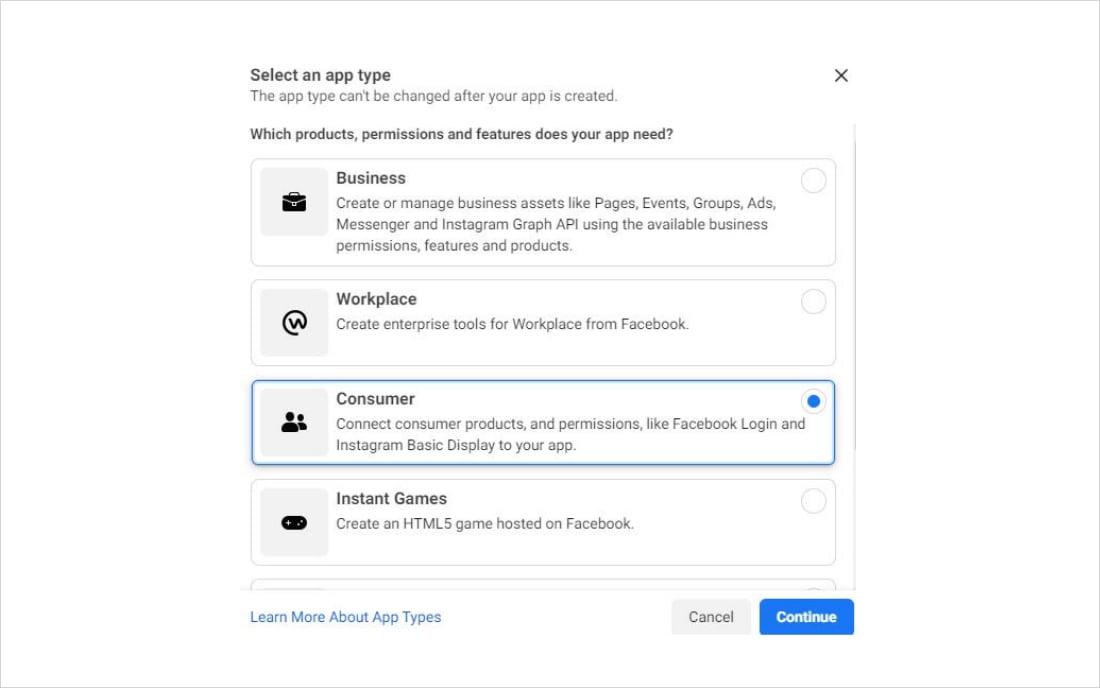
Later, fill in all the other required details. After successfully creating an app, you will see something like this –
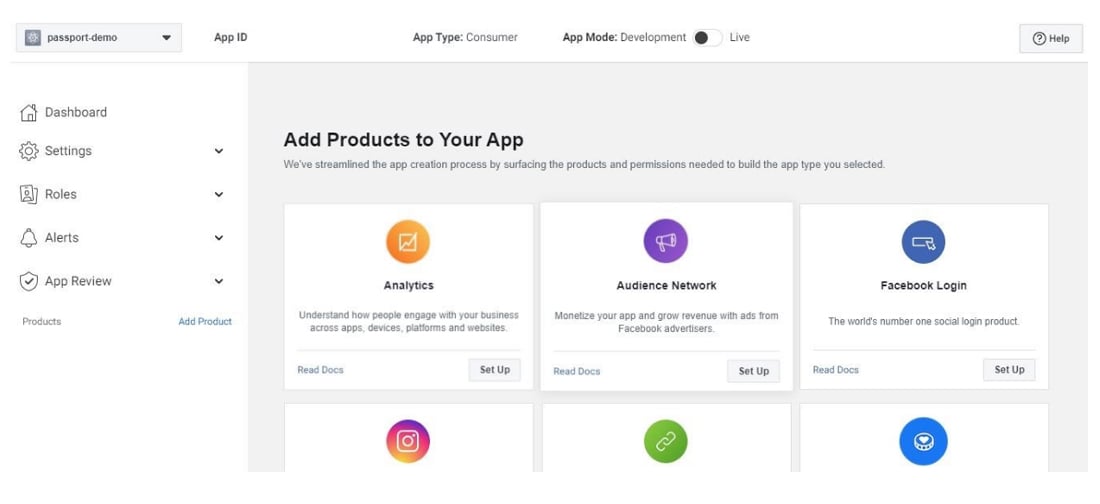
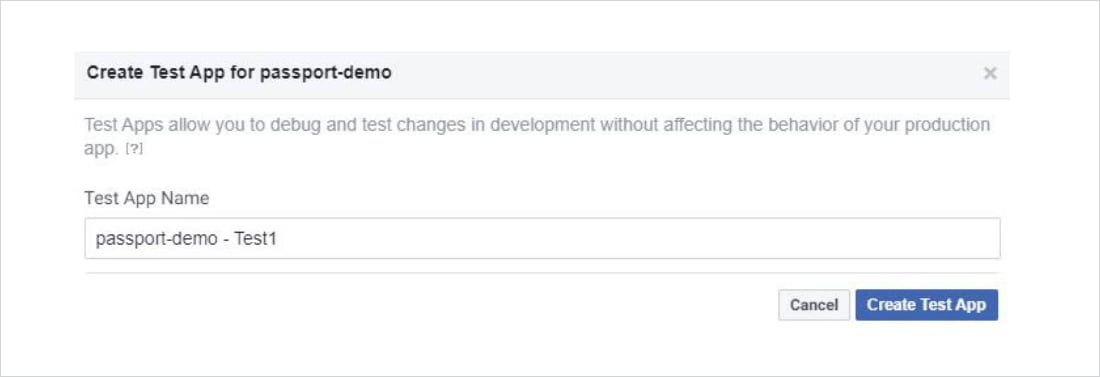
On the top left corner, you will see your app name. Click on that drop-down menu and choose “Create test app.” We need to create a test app for the same app that you made just now for development purposes. If you want to use a regular app for authenticating login requests, you will need to host your privacy policy page on some domain. Hence, just for development and debugging purposes, we will create a “test” app out of our newly created app.
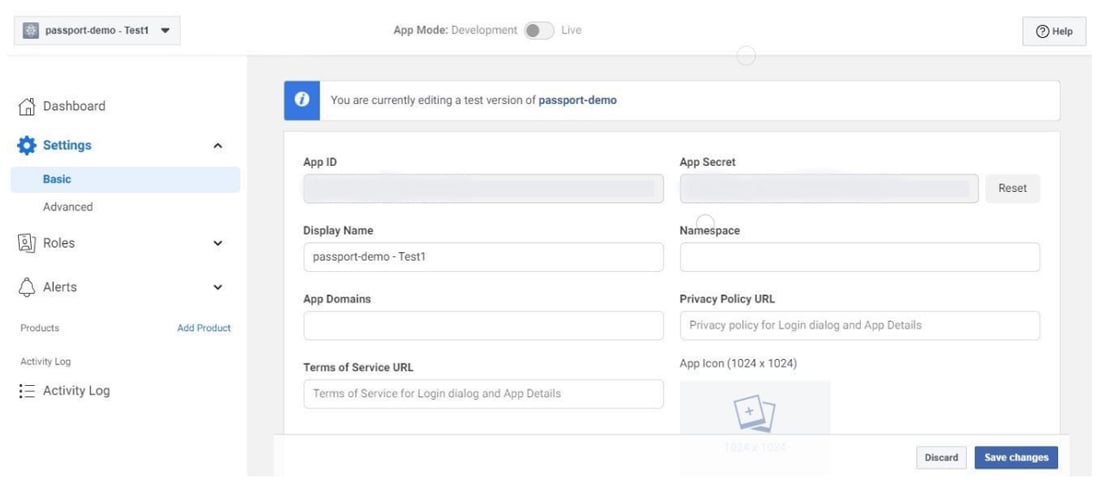
After creating the “test” app, you will see something like this. Go to “Settings -> Basic.” Here you will get your App ID and App secret. We will be using the same in our code. After noting it down, we need to add our website path (URL) for authentication requests to Facebook. For that, head over to the very bottom of the settings page, you will see the “Add platform” option. Select “Website” as a platform. And then enter the URL as shown below.

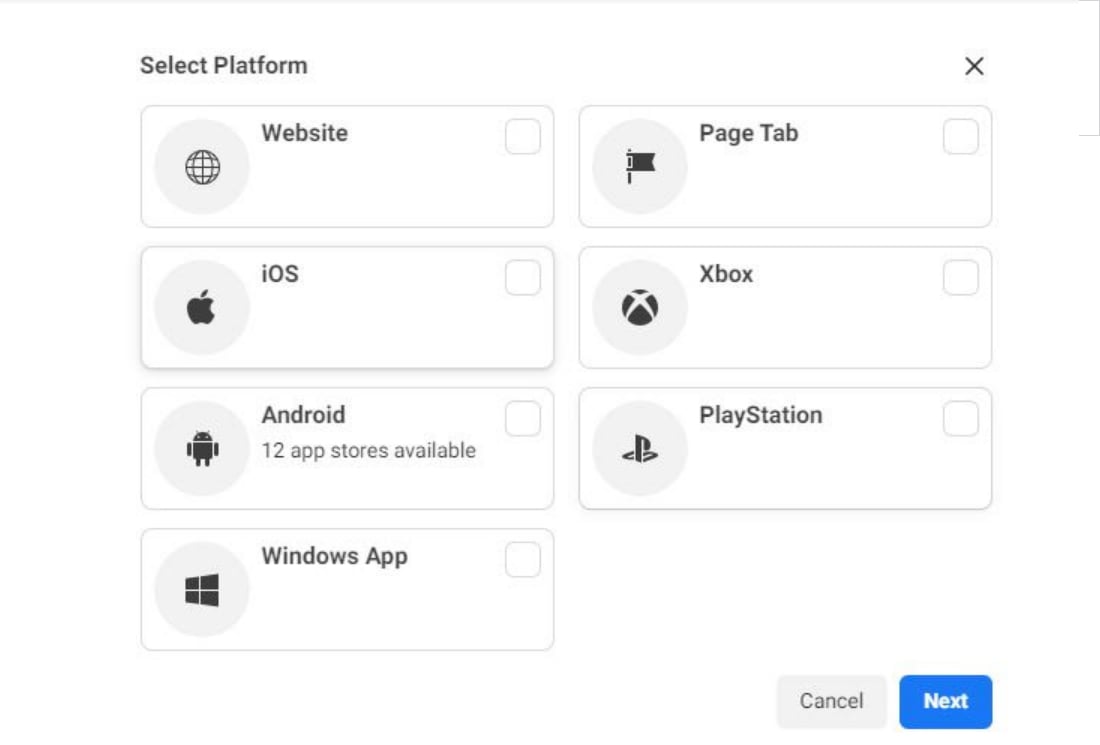

That’s all for setting up a Facebook developer account. Now let’s quickly head on to the coding part.
Your project structure should look like this. Create all the files and directories mentioned here.
1. models
2. user.js
3. passport.js
4. server.js
Run the following command to initialize our Node Package Manager (npm)
We have a total of four dependencies in our project – express, mongoose, passport, passport-facebook. To install these dependencies, run the following commands –
Finally, we are done with the project setup and installing dependencies. Your project structure should look something like this –

Now it’s time to code.
At the very first, we’ll set up a basic express server and connect our MongoDB database with our app. You can use any database for this purpose.

const express = require('express');
const passport = require('passport');
const mongoose = require('mongoose')
require('./passport');

app.use(passport.initialize());
app.use(express.json());

app.listen(PORT,async () => {
  console.log("Server established at PORT : "+PORT);
  await mongoose.connect('mongodb://localhost:27017/passport_demo' ,{useNewUrlParser:true,useFindAndModify:false, useCreateIndex:true, useUnifiedTopology:true}).then((resolved)=>{
      console.log("Database Connected");
  }).catch((rejected)=>{
      console.log("Database connection unsuccessful");
  });
});
As you can see, we imported the “passport” library, our “passport.js” file, and then initialized the passport using the app.use(passport.initialize())
After this, we will set up a very basic model (models/user.js) file for our database.

const mongoose = require("mongoose");

const userSchema = new mongoose.Schema({

  fbID :{
    type : Number
  },

  name :{
    type : String
  },

  email :{
    type: String
  }

});

const User = mongoose.model('user',userSchema);
module.exports = User;
Now all the basic code is done. Let’s now start implementing the passport library.
We will define four basic routes in our express application (server.js). These four routes will do all the work, from requesting Facebook credentials from users to handling login responses. Define the routes shown below in the server.js file before establishing the server (app.listen())

app.get('/login', passport.authenticate('facebook' , { scope : ['email'] } ) );

app.get("/login/callback",passport.authenticate("facebook", {
  successRedirect: "/home",
  failureRedirect: "/error",
  session : false
  })
);

app.get('/home', (req,res) => {
  res.send("Welcome user. This is Home page");
});

app.get('/error', (req,res) => {
  res.send("Error");
});
Explanation
/login
/login/callback
It is a callback route. After entering credentials, this route will be called by the passport strategy. We have defined routes for successful (/home) and failure(/error) responses.
1. /home – It will be fired when there is a successful response from Facebook login.
2. /error – It will be fired when there is an incorrect response from the Facebook login.
That was everything required for the server.js file. Now let’s hop on to define the logic to all the routes and step ahead to implement PassportJs authentication in NodeJS, or we can call it as let’s define the passport strategy (authentication mechanism).
Passport strategy is always defined in another file for readability of code. We will define it in our passport.js file.

const passport = require('passport');
const strategy = require('passport-facebook');
const User = require('./models/user');
const FacebookStrategy = strategy.Strategy;

passport.use(
  new FacebookStrategy(
  {
    clientID : YOUR APP ID,
    clientSecret : "YOUR CLIENT SECRET",
    callbackURL : "http://localhost:3000/login/callback",
    profileFields: ['id', 'emails', 'name']
  },

  async function(accessToken,refreshToken,profile,done)
  {

    const id = profile.id;
    const name = profile.displayName;
    const email = profile.emails[0].value;
    const user = await User.findOne({fbID : id});
    if(!user)
    {
        const user = new User({fbID : id , name, email});
        await user.save();
        console.log('Facebook profile data stored in database');
    }
    done(null,profile);
  }
  )
);
Explanation
new FacebookStrategy() – Here, we initialize this function and pass an object as an argument. The object has properties like clientID, clientSecret which we have to get from our Facebook developer account (app id, app secret). Then there is callbackURL that we have already defined in the server.js file. And lastly, there is profileFields to mention all the fields you want from Facebook when a user successfully authenticates.
verify callback function – The second argument is what passport calls it; a verify callback. This function is invoked internally when a user is authenticated. It receives accessToken, refreshToken, and the user’s profile. This method must call a function, done() in our case, which indicates completion of authentication.
Inside the verify callback function, we’ll implement a simple logic-
Take facebook id, name, and email and check our database if a user already exists or not with the help of a facebook id. If there is no user with that facebook id, we insert those three fields into a new record and then call the done() function. If a user already exists, then just call the done() function.
That was all for our passport.js file. The coding part is completed here. Now just kick start your node server.
Command:

Now hit http://localhost:3000/login into your browser.

Enter your Facebook user account credentials. If credentials entered are correct, the user will be redirected to /home, our successRedirect.

If some error occurs in authentication, the user will be redirected to /error, our failureRedirect.
So, this was all about implementing Facebook Login using PassportJS in the Node app. The entire source code is available here: passport-facebook github. Feel free to clone the repository and play around with the code.
Now, I hope you are ready to implement Facebook Login using PassportJS in your Node application. Feel free to connect with us if you have any queries or suggestions for PassportJS authentication in NodeJS.
For more such tutorials, visit NodeJS tutorials, where you can explore basic and advanced NodeJS topics. Moreover, the guide will provide you github repository, which you can clone anytime and run on your system.
If you want a helping hand for your NodeJS project, we have a solution for that too! Without a second thought, contact us and hire NodeJS developer. We provide not only the best qualitative development but also optimum problem-solving approaches. Feel free to write us about your query or suggestions.
Your Success Is Guaranteed !
We accelerate the release of digital product and guaranteed their success
We Use Slack, Jira & GitHub for Accurate Deployment and Effective Communication.