We often use Private Key (*.pem) file to connect with our ec2 instance, it is best practice to store copy of your Private key(*.pem) file for backup, but what if you lost your (*.pem) file, although have root/admin credential for your AWS account still you must need (*.pem) file to connect with particular instance.
Let’s assume you lost your production instance Private key (*.pem) and you have to make some important changes in your instance, and you don’t have any snapshot of your instance EBS, That time it becomes too much frustrating, fortunately we have another way to connect with instance after lost Private-key(*.pem),
How?
As an example the name is ‘production’ and private-key name is ‘production.pem’ and if you lost or deleted this ‘production.pem’, then below are the steps to recreate a lost Private Key (production.pem) file for Amazon Linux EC2 instance (production). Before recreating the private-key (.pem) file, we need to launch a new instance in the same availability-zone (AZ).

Prerequisites:
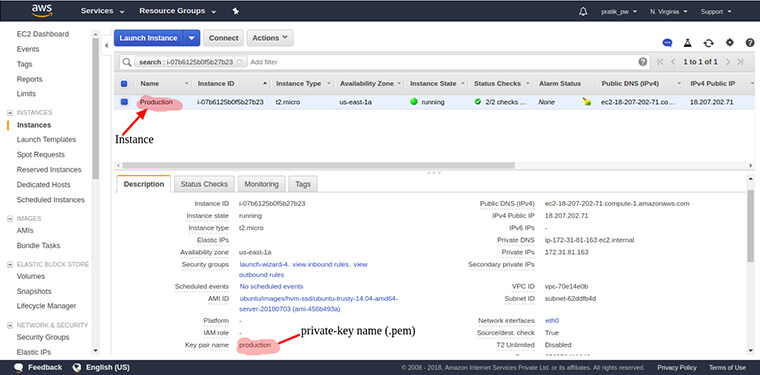
Step 1: Before Starting, we must have to note down the original instance availability zone (us-east-1a), Instance name and id you can find this on EC2 dashboard after selecting your instance.
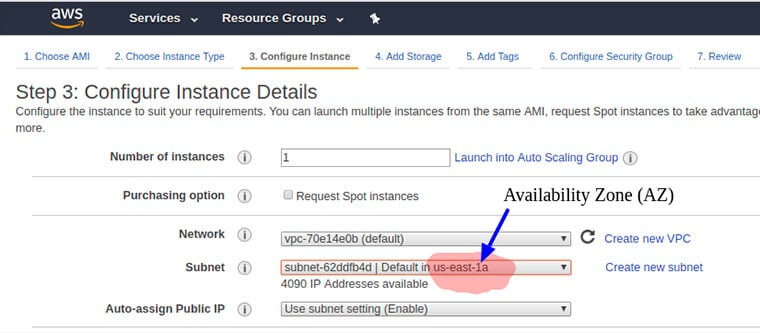
Step 2: Launch a new instance with same availability zone (AZ) as we note down before you can select Availability Zone (AZ) at 3rd step (Configure Instance) while creating an instance.

Step 3 : At last while we are launching instance we will see the key-pair section (at last) from there we have an option for creating and downloading a new key pair and then we can launch the instance. Now we have to login with a newly created instance using new key-pair.
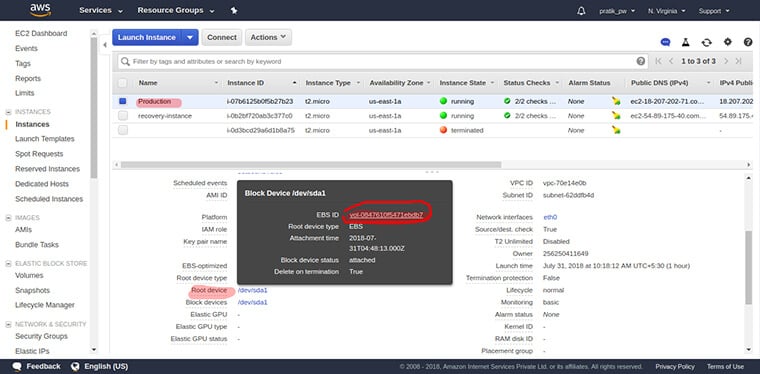
Step 4:As we know each instance contain one or more EBS volumes, that is instance storage, you have find out EBS volume of lost private-key instance, for that click on Instance Description and find , ‘ Root device ‘

Step 5: Now click on EBS ID this will redirect to EBS Volume page and give a name to this EBS volume so you can identify each volumes. Then we have to detach this volume from the original instance (production instance) for that we have to stop instance (left click on instance select Instance state -> click stop).
Step 6: Once production instance is stopped, detach EBS volume (left click on volume and select detach) and attach it to the newly created instance.
Note: If you didn’t find the newly created instance in Attach Instance wizard than something wrong with your Availability Zone (AZ)
Step 7: After Attaching EBS to the newly created instance, now you are able to connect this EBS using newly created instance. For that do log in to newly created instance terminal.
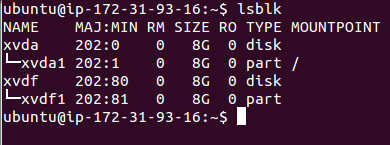
Step 8: After that we have to check whether new EBS is attached successfully or not with new instance you can check by running below command.
lsblk – This command is used for determining if the volume is partitioned

Step 9: If you find another disk than EBS is attached successfully, now we have to replace old authorized_eys (production or lost .pem) with new created authorized_keys for that run below commands.

 1. sudo mkdir /mnt/removery_vol
 2. sudo mount /dev/xvdf1	/mnt/recovery_vol
 3. cp .ssh/authorized_keys /mnt/recovery_vol/home/ubuntu/.ssh/authorized_keys
- sudo mkdir /mnt/recovery_vol
- This will create temp recovery directory to mount the volume
- sudo mount /dev/xvdf1 /mnt/recovery_vol
- Mount the volume (or partition) at the temporary recovery mount point, using the volume
- name or device name you identified earlier
- cp .ssh/authorized_keys /mnt/recovery_vol/home/ubuntu/.ssh/authorized_keys
- Copy new authorized keys to old EBS volume (old/production EBS)
Step 10: After successfully changes on authorized_keys, detach this volume from new instance and attach it with Production (lost private-key) instance, after attaching now start production instance.
Step 11: Congratulations, now you can connect to this instance using newly created instance Private key (.pem) file.

