Table of Contents
Introduction
🟠 Are you working on VueJs 2?
🟠 Is there a requirement to migrate from Vue 2 to Vue 3?
🟠 Are you frustrated and stuck with the entire migration process?
🟠 Do you want to end your struggle?
We are here to help you! Many of our technical readers have suggested writing a descriptive tutorial for beginners on migration from VueJS 2 to VueJS 3. So, here we are, back with the step-by-step guideline. Don’t worry if you are not familiar with the migration process. We will be learning it from scratch.
So, let’s understand why migration from Vue 2 to Vue 3 is essential.
Why Should You Migrate from Vue 2 to Vue 3?
The IT industry evolves with time, as does the technology and its technical requirements. Keeping the project updated is inevitable even if one of the technologies from the tech stack has been updated. It is because whenever the technology evolves, it updates its dependencies and libraries, removes unwanted garbage code, and adds new features that enhance the development and workflow.
Vue 3 is comparatively new updated technology. There’s no need to update your entire Vue 2 project to Vue 3 immediately, but you should start planning it out because as time passes, lesser third-party libraries will support version 2, and maybe VueJS will not lower the development support for version 2.
VueJs 3 is written from scratch and comes with even better performance, better tree-shaking, smaller size, improved TypeScript support, and many new features for developing large-scale enterprise software.
Now, before we begin the process of migrating from Vue 2 to Vue 3, it’s essential to understand the differences between the two versions and the improvements that have been implemented in Vue 3
Difference between Vue2 and Vue3
The major differences between Vue 2 and Vue3 lie in terms of technical features such as creating a new application, handling multiple roots, utilizing composition API, teleporting, implementing life cycle hooks, utilizing fragments, and improving performance. Let’s learn each of these aspects in detail.
🟠 Creating a new application
The first major difference between Vue2 and Vue3 is creating an application from scratch.
You will have to follow the standard process, which includes installing Vue CLI(command-Line-Interface)
To install Vue2 –npm install [email protected]
To install Vue3 –npm install vue
Also, in addition to differences in syntax, there are fundamental differences in the nature of the code itself. Creating an app involves a shift in how the code is written and the underlying principles guiding its development.
For example, in Vue2, when you use global configurations like mixins, it can cause issues during testing because the configurations can affect multiple instances, which leads to pollution of test cases.
Let’s look at an example of Vue2.

// this mixin affects both below instances
Vue.mixin({
  /* ... */
});

const app1 = new Vue({ el: "#app-1" });
const app2 = new Vue({ el: "#app-2" });
However, in Vue3, you can avoid this problem by using the “createApp(),” which allows you to create separate instances for your app. You can also use a local configuration like mixins that only affect a single model.
Let’s look at an example of the Vue3 code.

const app = createApp(App);
// This configuration effect only 1 instance
app.mixin(/* ... */);
app.mount("#app");
This way, you can create multiple instances of your app with their configurations without worrying about them affecting each other.
🟠 Multiple Roots
You can only have one main parent element in Vue 2. In this case, the “div” element is a single root element of the component, and If there are multiple elements, they must be first wrapped inside a single parent element.
Example of Vue2 component
On the contrary, a component can have multiple root templates in Vue3, so you can quickly return an array of elements without wrapping them in a single-parent element.
In the below case, “h1” and “p” are both root elements of the component.
Example of Vue3 component
🟠 Composition API
Composition API is an addition in Vue 3 and establishes a flexible way to organize code. The critical difference between Vue2 and Vue3 is the Composition API and how they handle the organization and component logic.
As you can see below, the component logic is separated into various parts, which makes it harder to understand and maintain
Example Vue2

export default {
  data () {
    return {
      count: 0
    }
  },
  computed: {
    doubleCount () {
      return this.count * 2
    }
  },
  methods: {
    increment () {
      this.count++
    }
  },
  watch: {
    count (newValue, oldValue) {
      // do something when count changes
    }
  },
  mounted () {
    // do something when the component is mounted
  }
}
The Comparision API in Vue3 allows developers to collocate code based on logical concerns in the ‘setup()’ function making the code easier to maintain and organize.
In Vue3, these features can be used in conjunction with the ‘setup()’ function to build Vue3 components
- Components
- Props
- Data
- Methods
- Computed Properties
- Emitting Events
Example of Vue3

import { ref, computed, watch } from 'vue'

export default {
  setup () {
    const count = ref(0)

    const doubleCount = computed(() => count.value * 2)

    const increment = () => {
      count.value++
    }

    watch(count, (newValue, oldValue) => {
      // do something when count changes
    })

    return {
      count,
      doubleCount,
      increment
    }
  }
}
The Vue3 demonstrates the use of the “ref() function to create a reactive variable which is smaller in comparison to the Vue 2 “data()” method.
The “computed()” function creates a computed property while the “watch()” is used to watch the changes. All these functions are imported from the “Vue” package making it easy to use.
🟠 Teleport
In Vue3, an interesting feature enables you to render a component in a different location than where they are logically placed, even though it is not within the scope of the app.

< example-component >
   < teleport to ="#teleport-target ">
     < pop-up / >
   < / teleport>
< / example -component>
< div id="teleport-target" >< / div>
For instance, in the above code provided, the “pop-up” component is placed inside the “example component,” but it is rendered within the div with the id ”teleport-target.”
This feature is particularly beneficial for displaying components in the various parts of the app, such as Pop-ups and modals.
🟠 Life cycle hooks
Vue2 Lifecycle method had lifecycle hooks such as beforeCreate(), created(), beforeMount(), mounted(), beforeUpdate(), updated(), beforeDestroy().
Example of Vue2

export default {
  data() {
    return {
      message: "Hello, world!",
    };
  },
  created() {
    console.log("Component created");
  },
  mounted() {
    console.log("Component mounted");
  },
  updated() {
    console.log("Component updated");
  },
  destroyed() {
    console.log("Component destroyed");
  },
};
However, in Vue3, all life cycle hooks are within the setup() method, and some hooks are renamed. For instance,
beforeDestroy() renamed beforeUnmount()
destroyed() renamed unmounted().
Example in Vue3

import { onBeforeMount, onMounted } from "vue";

export default {
  setup() {
    onBeforeMount(() => {
      console.log("Before mount");
    });
    onMounted(() => {
      console.log("Mounted");
    });
  },
}
Above is an example of how we can utilize onBeforeMount() and onMounted() within setup() to handle what we previously needed to do in beforeCreate() and created().
The Composition API replaces the old Options API and uses the setup() method as an equivalent of the old beforeCreate() method, with created() immediately following it. This simplifies component creation and eliminates the need for lengthy, unnecessary methods.
🟠 Fragments
Vue 2 only allows a single root node for components, whereas Vue 3 supports multiple root nodes using fragments for more dynamic templates.
In Vue 2, data properties are automatically reactive, but in Vue 3, you can use the reactive function to create more fine-grained and complex reactive data structures.
This function creates a proxy object that tracks changes to its properties, giving you more control over reactivity. Overall, Vue 3 offers more flexibility and control over reactivity compared to Vue 2.
Improvements from Vue2 to Vue3
There are significant technical differences that we covered now let us also have a look at the other improvements that one must consider to upgrade vue 2 to vue 3.
- Smaller core: Vue3 has a smaller core than Vue 2, which reduces library size and improves performance.
- Tree-Shaking: Vue3 has improved support for Tree-shaking, eventually eliminating unused code from the final bundle. It means there are small bundle sizes with faster loading times.
- Optimized Slot generation: Vue3 optimizes slots generation, which can help with the overall app performance.
- Hoisting and lining: Vue3 uses hoisting and lining to optimize the generated rendered functions, which results in faster component rendering.
- Improved Type Script support: Vue3 has better Type script support, which includes better inference for reactive properties and improved type checking for the Composition API.
- createApp method: Initialization Code in Vue 3’s ‘createApp’ method returns a new instance of a Vue app each time it’s called, allowing developers to configure each instance independently and share functionality without affecting the other instances.
As we move to the migration tutorial following are the breaking changes that you should look into for migration.
Migrate from Vue 2 to Vue 3: Breaking Changes
- Global API
- Template Directives
- Working of the Components
- Render Function
- Custom Elements
- Other Minor Changes (that might affect your project)
- Removed APIs
Tutorial Goal: Vue 2 to Vue 3 Migration
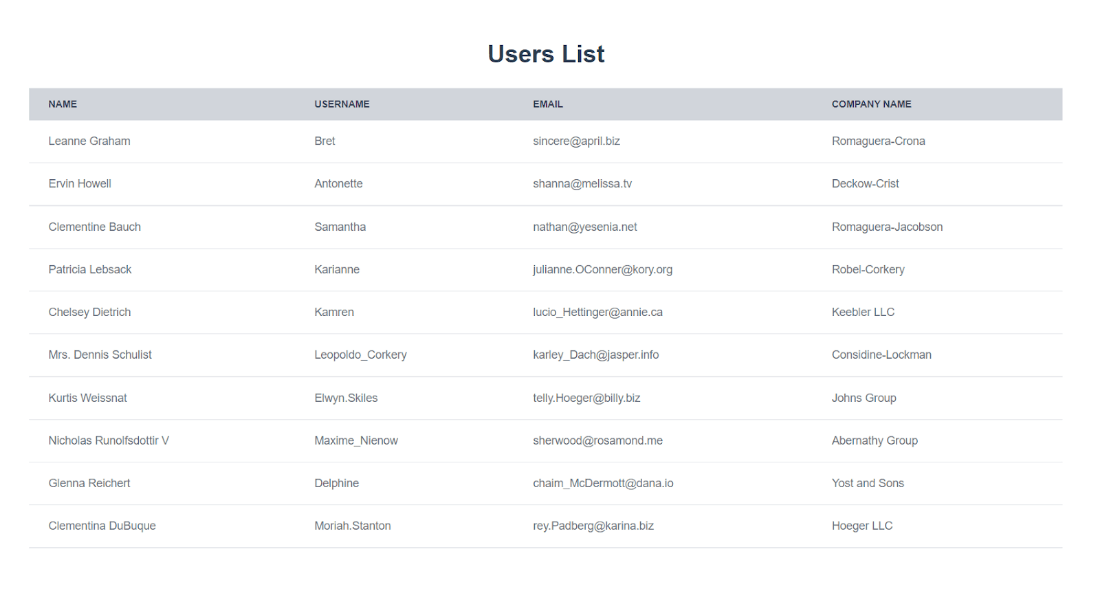
The migration process can be quite complicated and hectic. So, to ease out the process we have used a basic demo application that fetches the users’ data from JSON Placeholder API and will build a simple UI to display it.
So, here’s what we will be covering in our tutorial.
- Building VueJS 2 Demo App
- Update CDN scripts
- Update VueJS instance
- Update VueJS Router instance
Create VueJs 2 Project
Here we used Vue-2 to create our app.
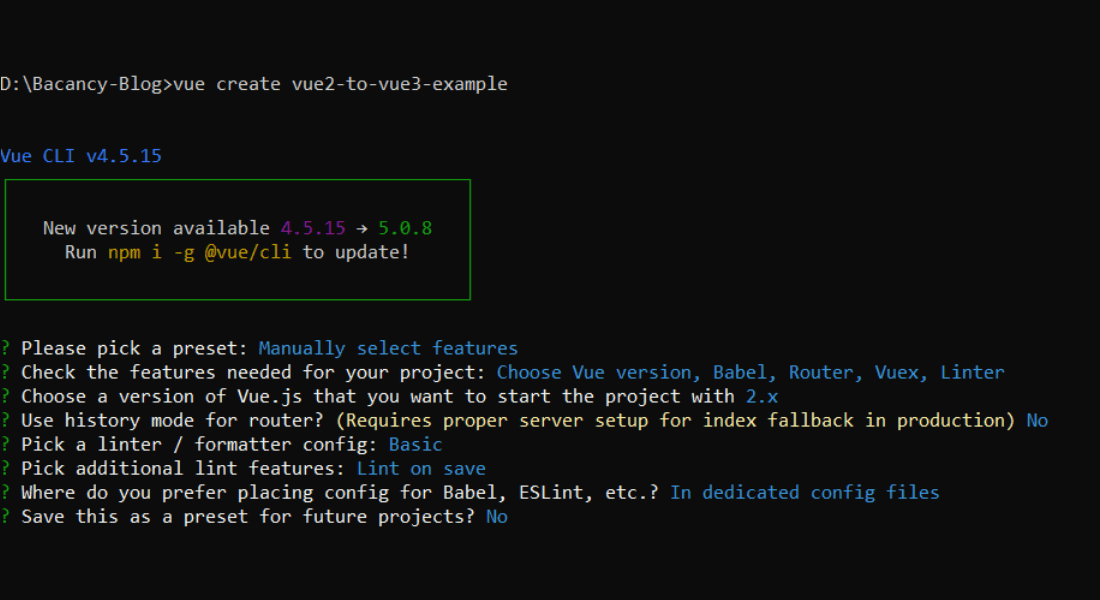
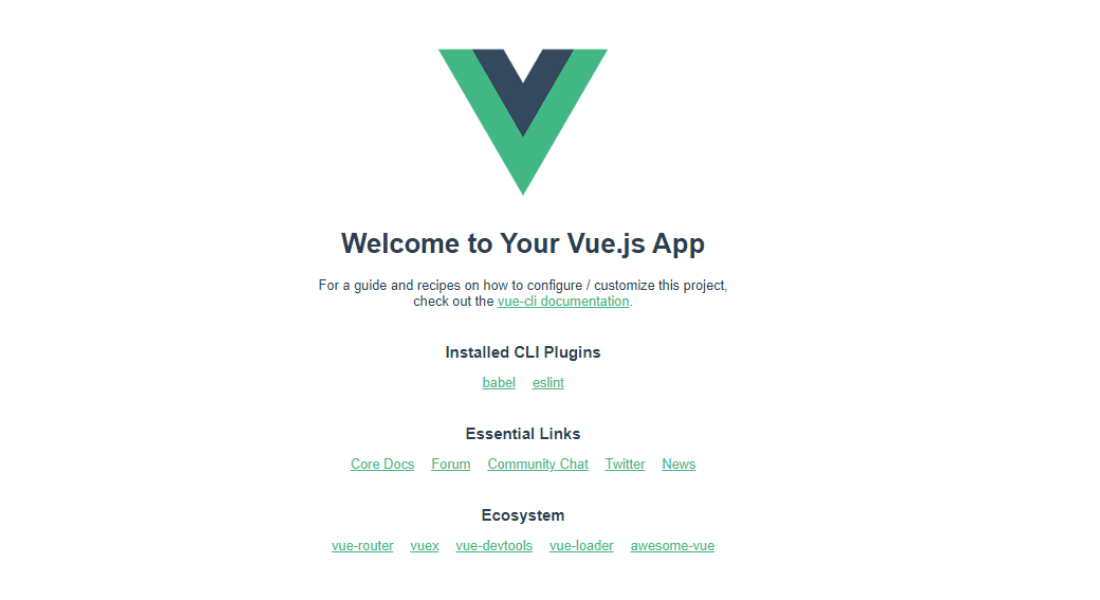
Navigate to your project and run the application using these commands.
Your browser will show the default UI as shown below.
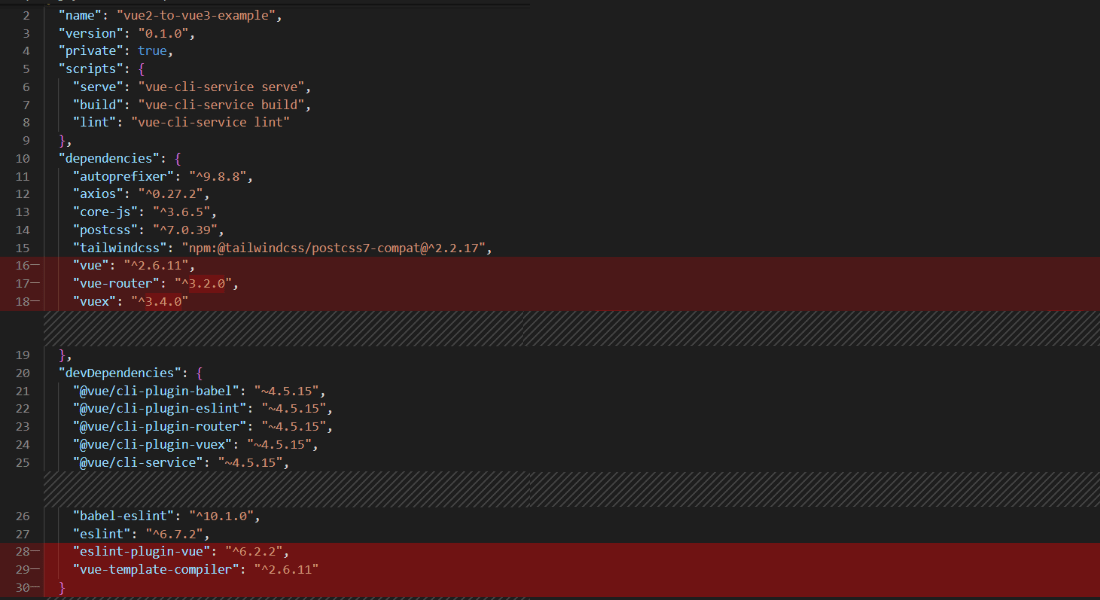
Vue2 package.json file.
Build User Interface
Each Vue Component lives inside the .vue file. A Vue component consists of three parts.
1. < template > – Contains component’s HTML
2. < script > – All the JavaScript logic is written inside this tags
3. < style >> – Component’s CSS is written inside this tags
Are you looking for proficient VueJs developers for your project?
Bacancy is here for you! Contact us now and hire Vue developer to build, optimise, and deploy your application.
Creating Components
Here we create two components:
- Home Component
- UserList Component
App.vue
App.vue is the parent of all components. It defines the template of our page.

<template>
  <div id="app">
    <div id="nav">
      <router-link to="/">Home</router-link> |
      <router-link to="/about">About</router-link>
    </div>
    <router-view/>
  </div>
</template>
Home.vue
In Home.vue component we have done the following things:
- We have called mapState, mapGetters, and mapActions from vuex
- We use a ‘mounted’ hook to fetchUsers
- We have passed ‘getAllUsers’ (mapGetter) and isLoading(mapState) as props to ‘UserList’ component.

<template>
  <div class="home">
    <h1 class="text-3xl mb-6 font-bold">Users List</h1>
    <user-list :getAllUsers="getAllUsers" :isLoading="isLoading"></user-list>
  </div>
</template>

<script>
import { mapActions, mapGetters, mapState } from 'vuex'
import UserList from '../components/UserList.vue'

export default {
  name: 'Home',
  components: {
    UserList
  },

  computed: {
    ...mapState(["isLoading"]),
    ...mapGetters(["getAllUsers"])
  },

  methods: {
    ...mapActions(["fetchUsers"])
  },

  mounted() {
    this.fetchUsers()
  }
}
</script>
UserList.vue
Here we will receive ‘getAllUsers’ and ‘isLoading’ props. Once the data is fetched we will use a table to display users’ data. v-for will loop over the getAllUsers array on ‘tbody’ element and display user data. We will also implement one of the features offered by Vue2, i.e., ‘filters.’ Here we will use the ‘SetEmail’ filter. It will return the user’s email with 1st letter small.

<template>
  <div class="container">
    <div v-if="isLoading">
        <h1 class="text-3xl font-bold">Loading...</h1>
    </div>
    <div class="overflow-x-auto relative" v-else>
      <table class="w-5/6 ml-auto mr-auto text-sm text-left text-gray-500 dark:text-gray-400">
        <thead
          class="text-xs text-gray-700 uppercase bg-gray-300 dark:bg-gray-700 dark:text-gray-400"
        >
          <tr>
            <th scope="col" class="py-3 px-6">Name</th>
            <th scope="col" class="py-3 px-6">Username</th>
            <th scope="col" class="py-3 px-6">Email</th>
            <th scope="col" class="py-3 px-6">Company Name</th>
          </tr>
        </thead>
        <tbody v-for="user in getAllUsers" :key="user.id">
          <tr class="bg-white border-b dark:bg-gray-800 dark:border-gray-700 hover:bg-gray-100">
            <td class="py-4 px-6">{{user.name}}</td>
            <td class="py-4 px-6">{{user.username}}</td>
            <td class="py-4 px-6">{{user.email | setEmail}}</td>
            <td class="py-4 px-6">{{user.company.name}}</td>
          </tr>
        </tbody>
      </table>
    </div>
  </div>
</template>

<script>
export default {
  name: "UserList",
  props: ["getAllUsers", 'isLoading'],
  filters:{
    setEmail(value){
        if(!value) return;
        value = value.toString();
        return value.charAt(0).toLowerCase() + value.slice(1)
    }
  }
};
</script>
Configuring Store: index.vue

import axios from 'axios'
import Vue from 'vue'
import Vuex from 'vuex'

Vue.use(Vuex)

export default new Vuex.Store({
  state: {
    users: [],
    isLoading: false
  },
  mutations: {
    GET_USERS(state, users) {
      state.users = users
    }
  },

  actions: {
    async fetchUsers({commit, state}){
      state.isLoading = true;
      const res = await axios.get('https://jsonplaceholder.typicode.com/users')
      commit("GET_USERS", res.data)
      state.isLoading = false
    }
  },

  getters: {
    getAllUsers(state){
      return state.users
    }
  },
  modules: {
  }
}
Output
How to Migrate from Vue 2 to Vue 3?
Now, we are done building a basic demo application with VueJS 2. Before, moving on to the files here is the basic process that’s need to be followed to migrate from Vue2 to Vue3:
- First, we make sure that our @vue/cli-service is in the newest version.
- To update our vue-cli command is – vue upgrade
- Now modify our ‘package.json’ file. Here we have to uninstall vue2 and vue-template-compiler. They are not needed for VueJS.
- Run the npm install command to install vue3, @vue/compat, and compiler @vue/compiler-sfc.
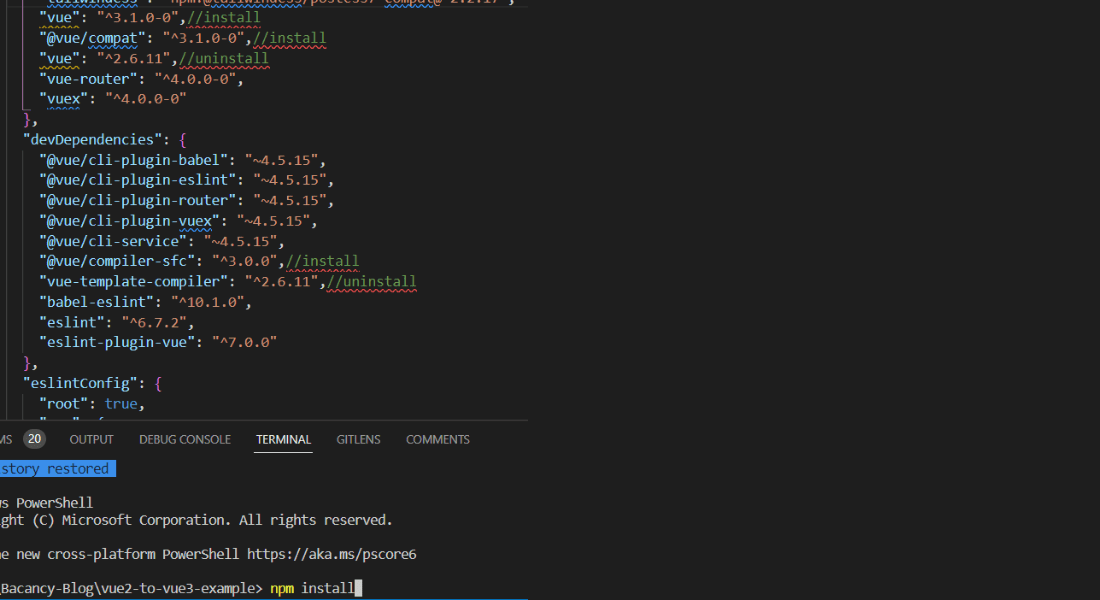
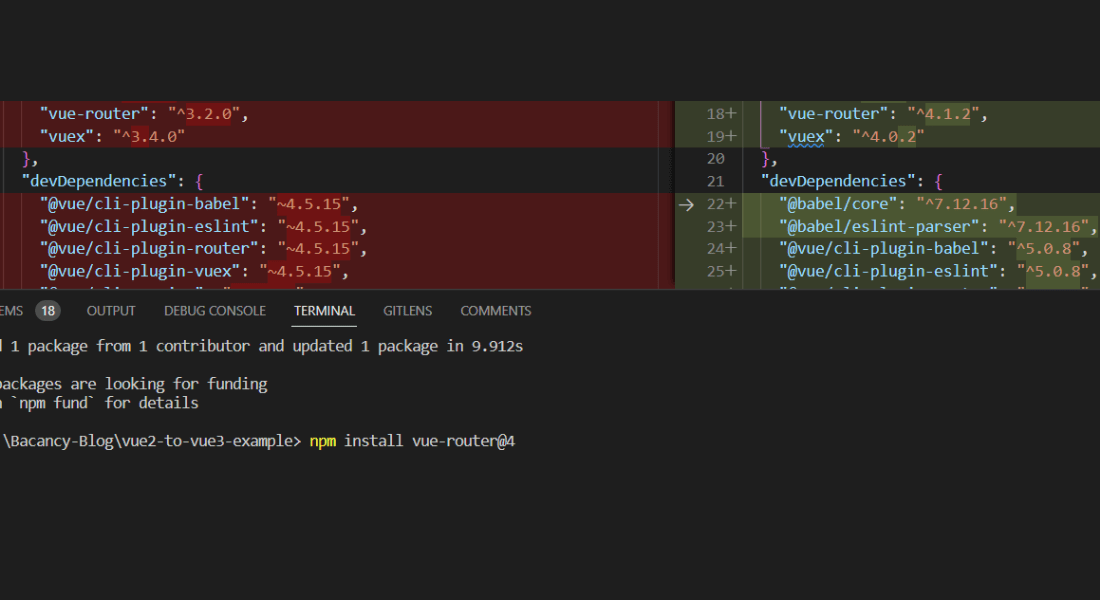
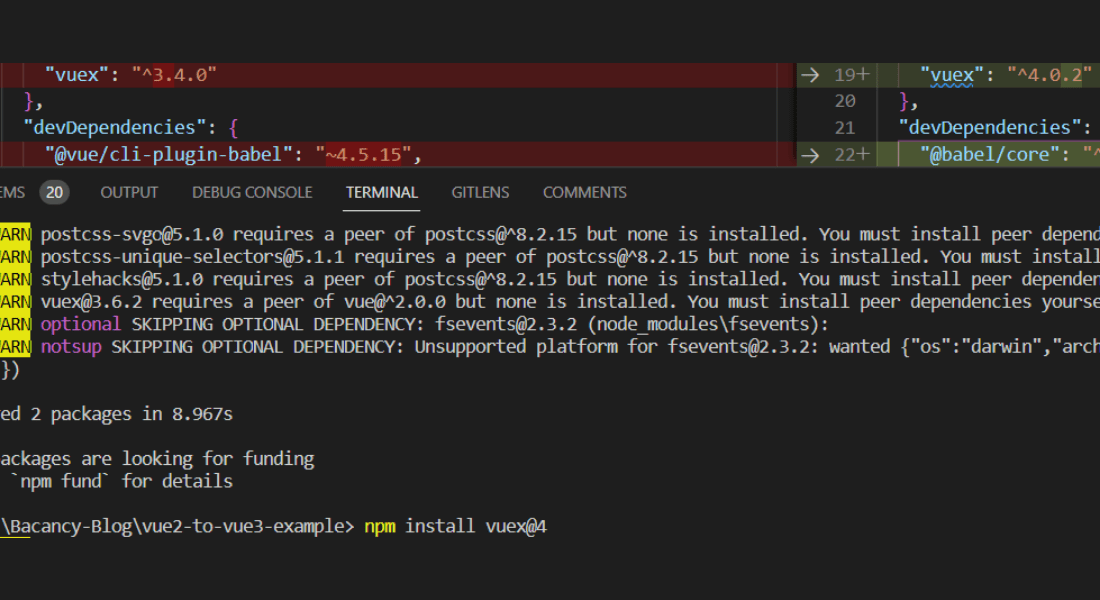
Install vue-router@4 and vuex@4 and update them to the latest version as shown below.
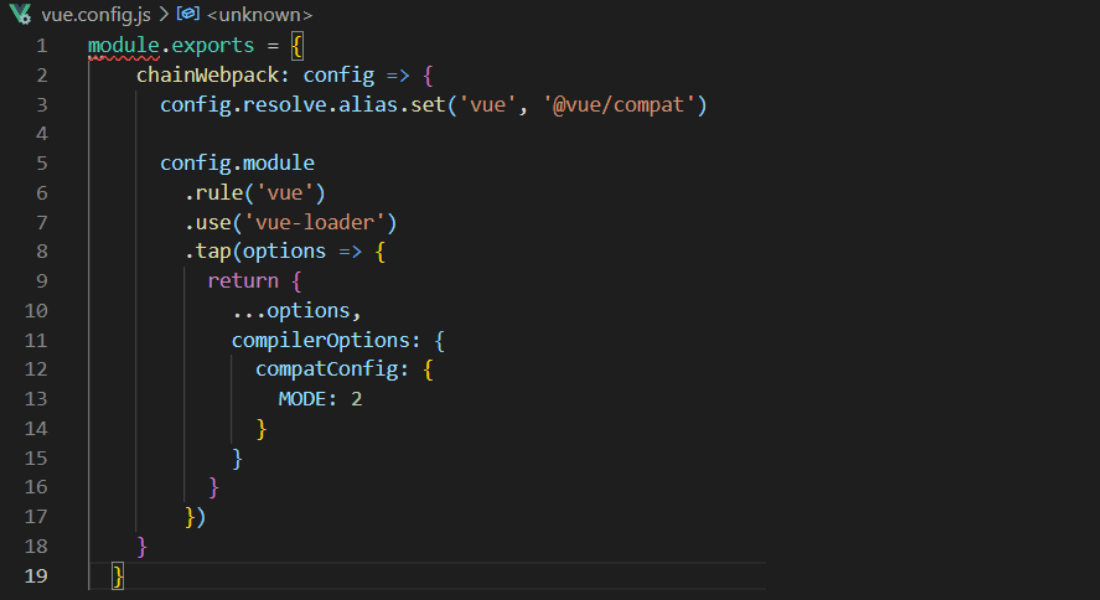
Create a vue.config.js file to set up the compiler option to get migration build work.
Once done with the basic configuration, start the development server. You will be notifies with some error messages. So, let’s get started to solve them
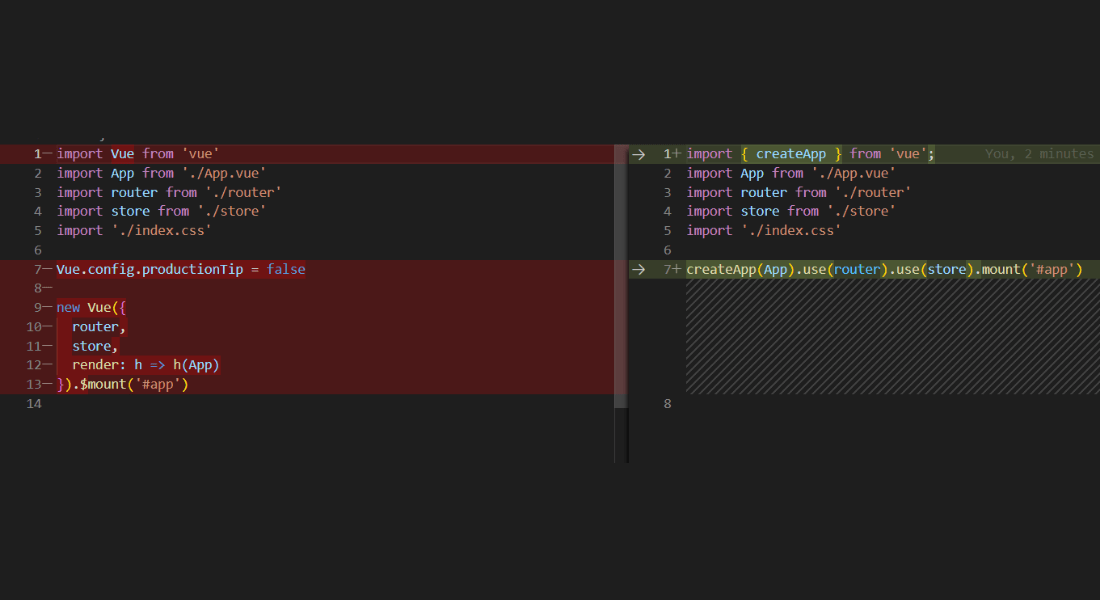
main.js
First, we will fix the main.js file for vue3. Below is the comparison.
// main.js
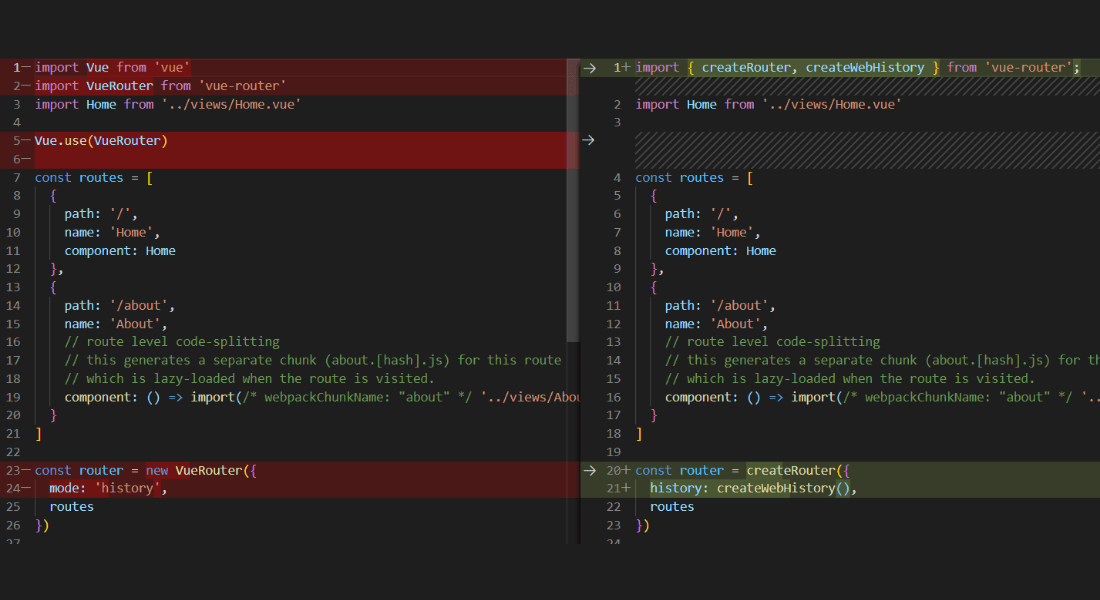
Router File: index.js
Now, open router file and use the below code for migration.
Store File: index.js
Now update store file.
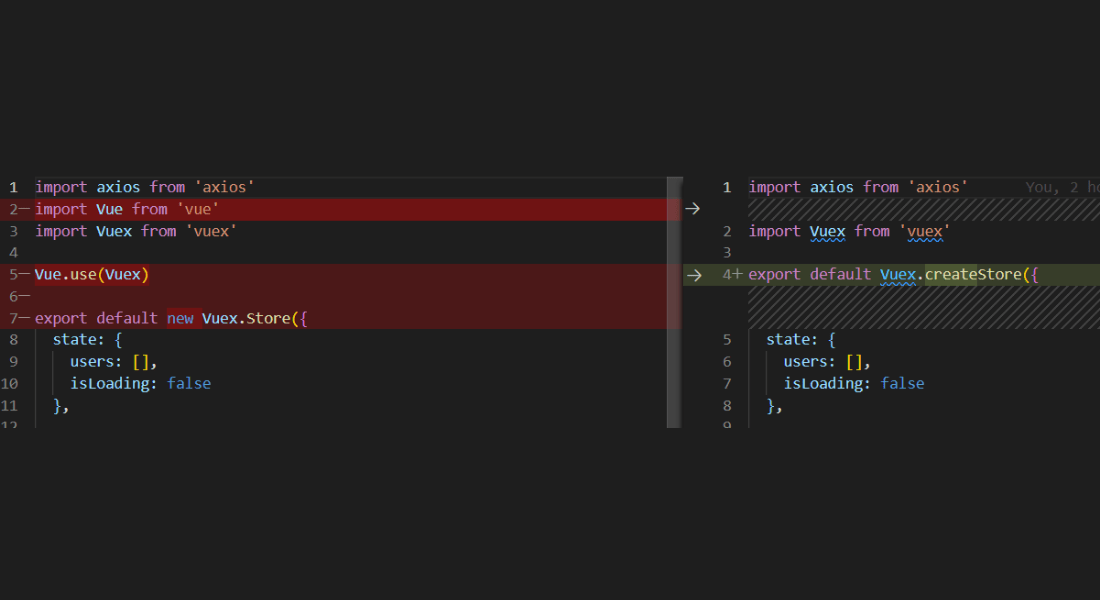
The remaing code in the store file would be as it is.
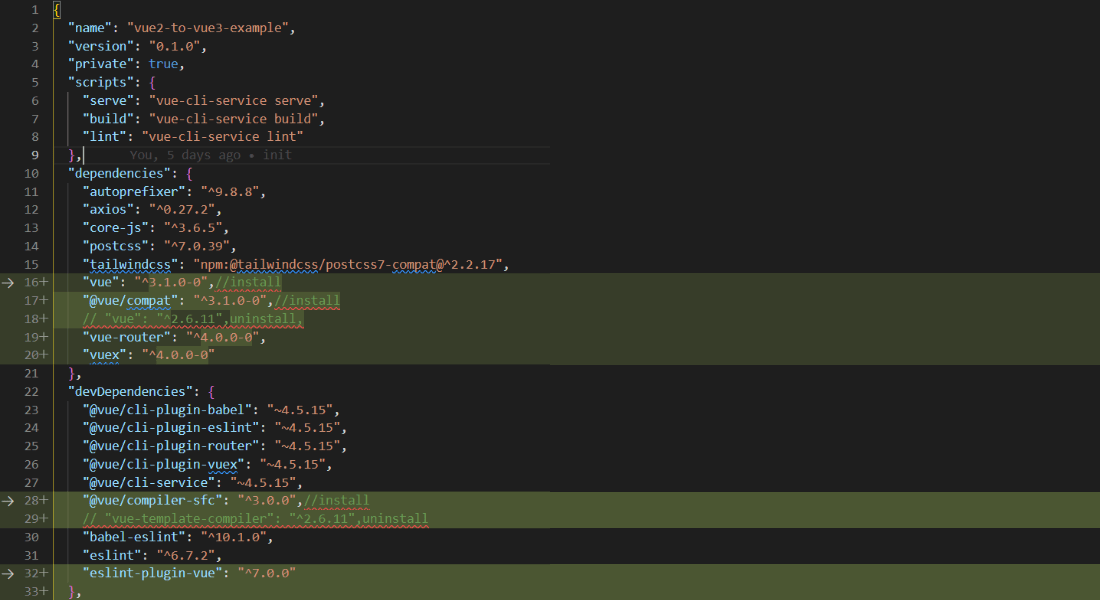
package.json file
We also need to update the package.json file. Use the below image where we have updated the dependencies.
Home.vue
Vue 3 came with a new feature called ‘compositionApi’, which is a replacement for ‘optionsApi’ However, you can also use optionsApi.
Here we use compositionApi.
- ‘onMounted’ is called after the component has been mounted. To use it we have to import it from ‘vue.’
- ‘setup()’ hook serves as the entry point for Composition Api usage in components.
- ‘computed()’ is same as computed() property in optionsApi. To use it in compositionApi, we have to import it from ‘vue.’ It takes a getter function and returns a read-only reactive ‘ref’ object for the returned value from the getter.
- To access the store within the ‘setup’ hook, we can call the ‘useStore()’ function. It is equivalent to retrieving ‘this.$store’ within a component using ‘Options API.’

<template>
  <div class="home">
    <h1 class="text-3xl mb-6 font-bold">Users List</h1>
    <user-list :getAllUsers="getAllUsers" :isLoading="isLoading"></user-    list>
  </div>
</template>

<script>
import { onMounted, computed } from 'vue'
import { mapActions, useStore } from 'vuex'
import UserList from '../components/UserList.vue'

export default {
  name: 'Home',
  components: {
    UserList
  },
  setup() {
    const store = useStore()

    const getAllUsers = computed(() => store.getters.getAllUsers)
    const isLoading = computed(() => store.state.isLoading)

    onMounted(() => {
      store.dispatch("fetchUsers")
    })
    return {
      ...mapActions(["fetchUsers"]),
      getAllUsers,
      isLoading
    }
  },
  // computed: {
  //   ...mapState(["isLoading"]),
  //   ...mapGetters(["getAllUsers"])
  // },
  // methods: {
  //   ...mapActions(["fetchUsers"])
  // },
  // mounted() {
  //   this.fetchUsers()
  // }
}
</script>
UserList.vue
In Vue 3, ‘filters’ has been removed. Instead of filters, we can use the ‘computed()’ property.

<template>
  <div class="container">
    <div v-if="isLoading">
        <h1 class="text-3xl font-bold">Loading...</h1>
    </div>
    <div class="overflow-x-auto relative" v-else>
      <table class="w-5/6 ml-auto mr-auto text-sm text-left text-gray-500 dark:text-gray-400">
        <thead
          class="text-xs text-gray-700 uppercase bg-gray-300 dark:bg-gray-700 dark:text-gray-400"
        >
          <tr>
            <th scope="col" class="py-3 px-6">Name</th>
            <th scope="col" class="py-3 px-6">Username</th>
            <th scope="col" class="py-3 px-6">Email</th>
            <th scope="col" class="py-3 px-6">Company Name</th>
          </tr>
        </thead>
        <tbody v-for="user in getAllUsers" :key="user.id">
          <tr class="bg-white border-b dark:bg-gray-800 dark:border-gray-700 hover:bg-gray-100">
            <td class="py-4 px-6">{{user.name}}</td>
            <td class="py-4 px-6">{{user.username}}</td>
            <!-- <td class="py-4 px-6">{{user.email | setEmail}}</td> -->
            <td class="py-4 px-6">{{user.email.toString().charAt(0).toLowerCase() + user.email.toString().slice(1)}}</td>
            <td class="py-4 px-6">{{user.company.name}}</td>
          </tr>
        </tbody>
      </table>
    </div>
  </div>
</template>

<script>
export default {
  name: "UserList",
  props: ["getAllUsers", 'isLoading'],
//   filters:{
//     setEmail(value){
//         if(!value) return;
//         value = value.toString();
//         return value.charAt(0).toLowerCase() + value.slice(1)
//     }
//   }
};
</script>
Testing in Vue2 vs Vue3
Testing in vue2 and vue3 with jest is similar, but there are some differences to keep in mind.
Here’s how you can set up unit testing with jest in vue2.
Vue2
If you use Vue CLI to create your project, then you can use the plugin called cli-plugin-unit-jest to create and run Jest tests.
This plugin gives us all required dependencies (including jest), also creates a jest.config.js file, and generates a sample test suite.
After that, you can install the Vue Test Utils package using npm or yarn like below.
Manual Installation
Here the main task is to install Vue Test Utils and vue-jest using npm or yarn to process SFCs:
Then, Jest can generate vue-jest files from .vue files. Here’s how you can do it. You can add the below configuration in package.json or in a separate Jest config file:

{
      "jest": {
        "moduleFileExtensions": [
          "js",
          "json",
          // tell Jest to handle `*.vue` files
          "vue"
        ],
          "transform": {
          // process `*.vue` files with `vue-jest`
          ".*\\.(vue)$": "vue-jest"
        }
      }
 }
For more details related to testing, you can check the below link.
installation
Vue3
Create a new Vue3 project using vue-cli.
Here you have multiple options, but you can select the “Manually select features” option and take “Unit Testing” and “Jest” from the list of features.
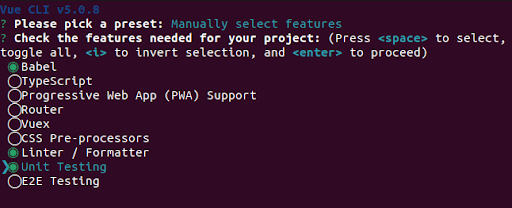

Run below command to generate a sample test file.
Open the generated test file in the “tests/unit” folder and write your test code.
Run tests by running the following command.
Note that in Vue3, jest is configured to use the new “@vue/test-utils” package for testing components. This package provides utilities for mounting and testing Vue components in a Jest environment.
Migrating from Vue Test Utils v1
If you want to know the unit testing changes from vue2 to vue3 refer to the below link.
migration
Github Repository: vue2-to-vue3-example
So, these were the steps to implement the migration process from vue 2 to vue 3. You can visit the source code: vue2-to-vue3-example. Clone the repository and experiment with the code.
Conclusion
I hope the tutorial will get you started with how to migrate from Vue 2 to Vue 3. When it comes to migrating an enterprise-level or large-scale project it will definitely demand a lot of time, management, and effort. But, you can always split the module and plan accordingly. If you are a VueJS enthusiast and want to learn more about VueJS, then the VueJS tutorials page is for you.
Your Success Is Guaranteed !
We accelerate the release of digital product and guaranteed their success
We Use Slack, Jira & GitHub for Accurate Deployment and Effective Communication.


